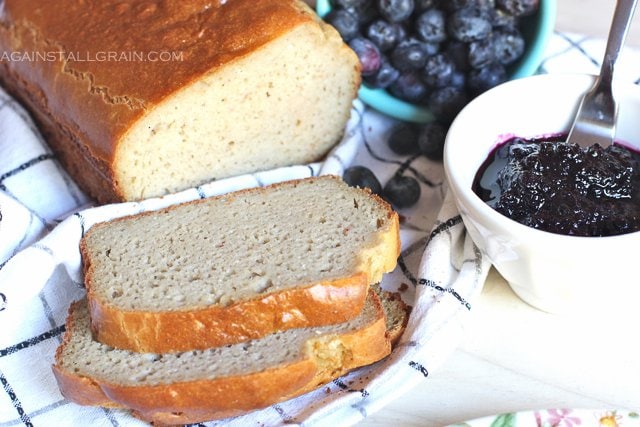
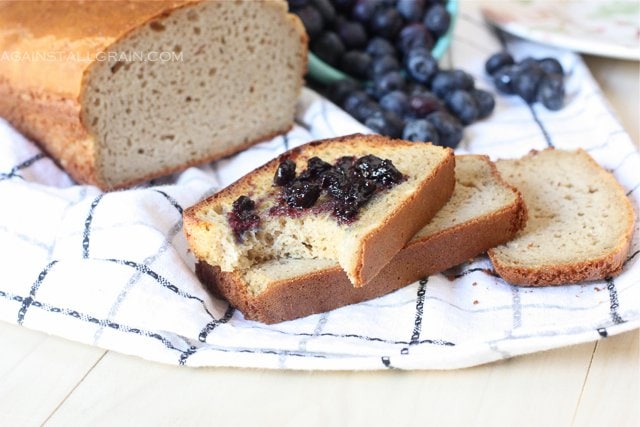
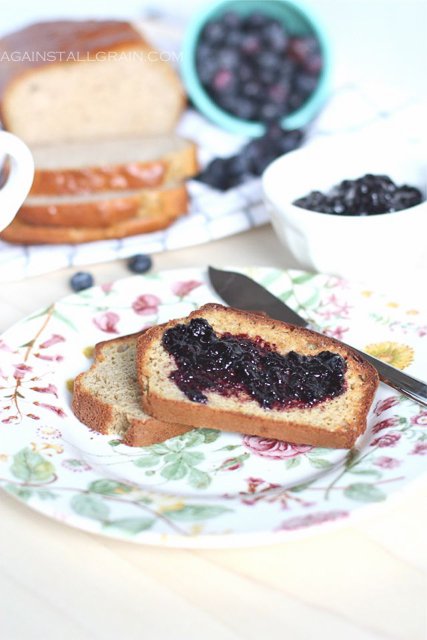
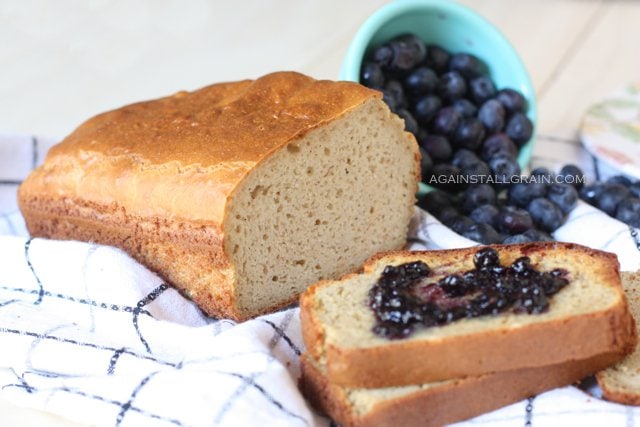
Grain-free Sandwich Bread (Paleo and SCD)
Danielle Walker - AgainstAllGrain.com
makes 1 8.5×4.5 loaf
American
Breads
Ingredients:
- 1 cup smooth raw cashew butter at room temperature
- 4 large eggs, separated (mine weighed about 9 ounces in their shells)
- ½ to 2 tablespoons honey (use 2tbl if you plan to use if for sweeter dishes like french toast)
- 2.5 teaspoons apple cider vinegar
- ¼ cup almond milk
- ¼ cup coconut flour
- 1 teaspoon baking soda
- ½ teaspoon sea salt
Instructions:
- Preheat your oven to 300 degrees. For a white colored loaf as in the photo, place a small dish of water on the bottom rack.
- Line the bottom of an 8.5×4.5 glass loaf pan with parchment paper, then spread a very thin coating of coconut oil on the sides of the pan.
- Beat the cashew butter with the egg yolks, then add the honey, vinegar, and milk. I’ve done this with both electric hand beaters and a stand mixer and both seem to work equally as well. I would not try to make this by hand due to the stickiness of the butter.
- Beat the egg whites in a separate bowl until peaks form. I used an electric hand mixer, but if you want a bicep workout, you can also do it by hand.
- Combine the dry ingredients in another small bowl. Sorry for all of the dishes!
- Make sure your oven is completely preheated before adding the egg whites and the dry ingredients to the cashew butter mixture. You don’t want your whites to fall, and the baking soda will activate once it hits the eggs and vinegar.
- Pour the dry ingredients into the wet ingredients, and beat until combined. This will result in more of a wet batter than a dough. Make sure to get all of the sticky butter mixture off of the bottom of the bowl so you don’t end up with clumps.
- Pour the beaten egg whites into the cashew butter mixture, beating again until just combined. You don’t have to be gentle with this, but don’t over mix.
- Pour the batter into the prepared loaf pan, then immediately put it into the oven.
- Bake for 45-50 minutes, until the top is golden brown and a toothpick comes out clean. Don’t be tempted to open the oven door anytime before 40 minutes, as this will allow the steam to escape and you will not get a properly risen loaf.
- Remove from the oven, then let cool for 15-20 minutes. Use a knife to free the sides from the loaf pan, then flip it upside down and release the loaf onto a cooling rack. Cool right-side up for an hour before serving.
- Wrap the loaf up tightly and store in the fridge for 1 week. I actually think the loaf gets better as the days go on.
A couple of notes
So far, the only way I’ve used this bread cold and not toasted is with an AB&J, and it was delicious! It is definitely on the more dense side compared to your breads with gluten and yeast, but it’s much lighter than a lot of the gluten-free breads sold in the store that are made with rice or tapioca. The bread gets even lighter and somewhat flaky when toasted or grilled in the panini press, so that is the way I’ve preferred it.
As for the cashew butter – I love Artisana’s product. I could eat it by the spoonful. It’s pricy, but no more expensive than almond butter (and I just found out has the same fat and calorie content!). You can make your own if you own a high-speed blender, but it takes some work. You may need to add a little coconut oil to get the extra smooth consistency that Artisana offers (I’ve used 1/4 cup oil with 1.5 cups raw cashews). If you have a lumpy cashew butter, this bread will not work. The loaf made with homemade cashew butter will also come out a little darker and a bit more moist due to the oil.
The loaf doesn’t stand very tall, so for larger slices of bread like the french toast below, slice it in half, then lengthwise.
And lastly, for all of you coconut-phobes out there- Not to fear – this bread tastes absolutely nothing like it despite the use of coconut flour!
Dairy free, gluten free, paleo, scd, vegetarian, breads, sandwich
Hi there! The photos of this recipe and content above are copyright protected.
Please do not use our photos without prior written permission. Please do not copy this recipe and share it on your own site. If you wish to tell people about this recipe, please provide a link back to the recipe here on my blog rather than copying the recipe. If you make significant changes to a recipe, you are welcome to rewrite it in your own unique words and provide a link back here for credit. Thank you!


Micaela Marques
Yay! I can’t wait to try it! It looks absolutely delicious.
Ginger
Can I use what I have and use almond flour instead of coconut flour and coconut butter n stead of another nut butter? I have everything else. I was hoping I could adapt this recipe to what I have available right now. Thank you for this yummy looking bread alternative to grains. :0)
Mrs G
No, you can’t.
Almond flour is slightly moist due to oil content of the nuts, while coconut flour is very dry, because it’s basically dried coconut very finely ground. Therefore it has a very high fiber content and it absorbs much liquid. Being so dry it needs some binding, hence why recipes with coconut flour as main ingredient need many eggs.
I’m not 100% sure about coconut butter, but I personally would not try it as they have a very different texture.
Leona
Where do you find SCD almond milk? I have not been able find almond milk that would be SCD legal. Thanks.
Against All Grain
You will need to make it homemade for it to be truly scd legal. There’s a recipe in my book
Lealie
Made this bread today for the first time and I loved it! I toasted it for a BLT and it didn’t fall apart. This will be bread I will be baking frequently!
amber
Danielle….you’re my hero right now. Bread is the main non-SCD food I eat (and too much of it). I also hate yeast, so this bread is perfect and amazing. Seriously, you are such a treasure my dear. You provide the community with such practical recipes. I’m making this today and FINALLY I can eat a sandwich and not feel guilty. 🙂
Thank you, thank you!!!
Hugs,
–Amber
Against All Grain
Thanks Amber!! For an untested sandwich, you may want to let the bread sit in the fridge for one day. It will be a little moist on the first day without toasting it. Coconut flour is funny like that..
Chris
Has anyone tried using this recipe as a base for paleo pizza crust?
Tonia
That look absolutely WONDERFUL!! Thank you for sharing! Can’t wait to try it. In fact I may do this today!
Carolyn
Thanks so much for the recipe–it looks delicious! Can I ask what brand/kind of almond milk you use? I haven’t bought any yet and am wondering if there is a preferred one.
Thanks for your help.
Against All Grain
I try to make my own whenever possible but I do buy the 365 organic one from WF because it has the least amount of additives in it.
Against All Grain
Oh and make sure you buy unsweetened!
Erin @ Texanerin Baking
Oh my, that looks amazing! I will definitely be making this the next time the oven goes on… so maybe in a few days. The texture looks awesome. I can’t wait! I live in Germany where cashew butter (if it even exists here) costs a fortune, so I’ll be making the homemade cashew butter version. And I like moist! As long as it’s not soggy. 🙂
jenny
Could you replace the honey w stevia?
Against All Grain
I’m sure you could! Although I’m not sure the ratios. I assume it wouldn’t take much
Nancy
I tried the recipe with pure liquid stevia – used 2 drops and that gave just a hint of sweet which was perfect for sandwich bread.
Diane
Look forward to trying it!
Will you be posting nutritional breakdown?
Jan
Oh. My. That looks amazing!! I will definitely want to try this out!
Heba @ My Life in a Pyramid
Danielle, I’ve been excited about this recipe ever since you shared on FB that you’re in the process of putting it together! I can’t wait to try it out soon 🙂 I’ve pinned and shared on FB. Take care!
Against All Grain
Thanks Heba! I hope you enjoy it!
Natalia
Is it possible to substitute almond milk with something? Maybe yogurt?
Nancy
I made the bread for the first time yesterday and YUM!!! Delicious!!! I used Trader Joe’s Light Coconut Milk as a replacement for the almond milk since it was what I had in the pantry and it worked well. You could not taste coconut. I’ll try the almond milk next time, but for the record….. coconut milk worked.
Against All Grain
Thanks Nancy! I kind of figured coconut milk would work especially because it’s such a small amount. I think any non-dairy milk would do just fine! So happy you like it!!
Elena
Thank you so much for this recipe ! You are genious ! I will bake this bread for my grandson who has Type 1 diabetes ( with steveia instead of honey ). Is it possible to use this dough to make calzones or hot pockets ?
Erica
think it would work with almond butter? I have that in the house right now, LOL
Against All Grain
It won’t work with almond butter. Almond butte is much heavier and darker in color due to the skins so you won’t get a fluffy “white bread”
Erica
thanks.. I’ll get some cashew butter this week!
suchlovelyfreckles
Okay, so it’s darker (which in my case is actually a positive thing, because I never did like white bread)… What I’m interested in is the heavier part. It would just make it more dense, right?
Against All Grain
Did you use homemade cashew butter with oil in it?
Denise
I used store bought cashew butter and mine also turned out looking like “wheat bread” as opposed to white and is also still heavy and dense after baking it two days ago. I wrapped it in tin foil. Is there something else I should wrap it in?
Thanks for sharing!
Pat
I just made this and first of all, it was delicious, but mine was brown and more on the dense side too. I followed the directed and even bought the Artisana organic raw cashew butter. I’m happy with it, but wondering what went wrong…Oooops, just thought of something, I didn’t have a glass loaf pan and used a metal one…
Tarts and Crafts
I made it with almond butter and it worked great. It was darker and denser, but tasty and great for breakfast with a pat butter, just the same.
bj armstrong
Wow..thank you so much for this recipe..it’s the real deal..me and my wife have been Paleolithic 3 mo..and the other night she just broke down because ” I need Real bread”… but your recipe was perfect….we made our own cashew butter( didn’t have any)…and own almond milk(didn’t have any either)…and it was heavenly!!!! Thank you
Knocked Up and Nursing
I JUST made this with almond butter (my son is allergic to cashews) plus i used coconut milk instead of almond because it is what i had. The bread is dense. Mine didn’t rise as much as the pictures… Perhaps it was my actually mixing or the almond butter. I made it to go with dinner for sandwiches but, I should have made it a few days ago, like the recipe said, to sit in the fridge. Taste is good. It’s dark almost like a pumpkiny color.
Laura
ok, i made this and mine too came out dark and dense. I am not a baking novice…. but I don’t see what the appeal is to this bread. does it get that much better if you bake it?
Laura
I meant toast it
Sassy Stephanie
Oh my. Just made this yummy recipe. Thanks so much!!!
Against All Grain
So great to hear Stephanie!! Wait til tomorrow, it gets better!!
Michelle
I want to make this but am wondering what the purpose of the honey is?? Could you make it without the honey all together? As there is no yeast to feed I assume it’s for taste?? Thanks for your efforts, I’ve made coconut flour bread before but it had much more coconut flour in it than this recipe and although we quite liked it, it left me feeling bloated and heavy for a few days afterwards!! I am hoping this recipe wont due to the small amount of flour in it!
Against All Grain
The honey is only for flavor. Feel free to leave it out if you’d like! I only do a 1/2 tablespoon when I make it for sandwiches.
Amy
I made this the first time without any sweetener and it was all around okay, but it needs the sweetener. The second time I added 30 drops of NuNaturals Vanilla Alcohol Free Stevia and that did the trick. This amount would be great for the french toast version! It would probably taste okay for sandwiches with just 15 to 20 drops.
Katie Zuko
OK I know I was supposed to let it cool for an hour but I let it sit for 30ish minutes and then I sliced a couple slices and made a little grill cheese with asiago, parm and cheddar and it was DELIGHTFUL! I can see when it’s a little drier tomorrow it will be even better!!! YAY and it was super easy to make! Then I went back for more and had a 2nd grill cheese. 🙂 I’m pregnant and due next week so I’m gonna go ahead and make a few loaves and freeze them to add to my freezer stock of “Food Mama Can Eat” after baby comes. I have to be strict SCD so it’s hard for other people to feed me.
Great Recipes!!
Katie Z
Against All Grain
Thanks for sharing Katie! I wish I would have had this bread when I was pregnant. I would have lived off of it! Mate next time… :-). Good luck with your delivery!!
apryl
i keep seeing your homemade preserves on your posts, so now i’m wondering if you’re going to share your recipe?! i’ve made jam for years, but never a sugar free variety, so i’m looking for great recipes/methods.
Against All Grain
I will be sharing it tomorrow most likely! It’s just blueberries, honey, and lemon!
Rachel
Here is a good preserve recipe 1 1/3 cup of berries/fruit of your choice (i’ve used rasberries-blueberries and peaches) 2/3 cups of rhubarb, 2 Tb Chia seeds,2Tb honey mix in blender or food processo till well blended. The Chia seeds kind of gel to make it more jelly like texture and are super healthy!
Trish @ MyBigFatBundt
Wow…this is almost too good to be true! No grains, no gluten, and no yeast?? I’ve made my fair share of really good gluten-free breads, but all have contained yeast, and my body doesn’t like a lot of yeast. And g-free breads are starchier than their wheat counterparts, so I usually just end up going with freshly baked bread from the bakery. I bet it makes a wonderful french toast for sure! Just spotted this on Slightly Indulgent and am bookmarking the page! Thanks for sharing. xx
Heather Bush
I shared several of your recipes on my blog. LOVE your blog! Thanks for sharing with us!
Against All Grain
Thanks Heather!
Lynn
Thank you so much for this recipe it’s awesome. Easy to make and really tasty. I used home made cashew butter and honey from my friend’s bees. I can’t wait to try it in a grilled cheese sandwich. Kind of wish we weren’t having steak for dinner 😉
Becca
This looks amazing. Thank you so much! My son is GFCFSF and we have thought about going SCD. This is a wonderful addition to our meal plan. I am wondering though, do you mix it in a stand mixer??? Also, have you tried doubling? Does it take more baking time? Thank you Thank you Thank you!
Against All Grain
Thanks Becca- I need to edit the recipe to say I actually used hand beaters for this, but a stand mixer will work too. This is a doubled recipe from the very first time I made it and I probably wouldn’t do anymore batter in one loaf pan so it doesn’t get too dense.
Erin @ Texanerin Baking
So I did this with homemade cashew butter. It was the first time I made it (or had even had cashews) and it came together very quickly and without oil. It had the same texture as homemade peanut butter so I hope it was good enough! I don’t follow any special diet but like to eat grain-free when possible, and I found the bread tasty! But I much preferred it toasted (just like with any grain-free bread I’ve tried). I mixed the wet mixture with the hand mixer, but for some reason, thought I was supposed to fold in the dry ingredients until combined (I was making two things at once and guess I got confused). Don’t do that! It had brown blobs here and there and I’m sure it wouldn’t be the way had I followed directions. Thanks for the recipe! 🙂
Against All Grain
Haha Erin “brown blobs” does not sound appetizing! I’m glad you enjoyed it. I like it best toasted too but I actually love it cold with PB&J 🙂
Erin @ Texanerin Baking
It kind of looks like it’s a badly done cinnamon swirl so it’s not nasty looking at all. 🙂 Thanks again!
Keirnan
This is in the oven right now!!! Thanks for the recipe.
Katie Zuko
I made some French Onion Soup and used a toasted piece of this lovely bread. I don’t own ramakins so I just put parchment on a cookie sheet put my toast on it and covered it in cheese the broiled it for a couple minutes til melted and toasty then I just spacula’d it up on top of my soup and oh yumm yum! This bread is awesome!
Katie
Against All Grain
I love French Onion!
liese
Oh Wow! Great Idea! I love French Onion Soup…
Fiona Elliott
Hi everbody, this bread looks super delish, i have heaps of pumpkin so going to make some soup and use this bread to dip with. Yum. Has anyone ever made it egg free? maybe with flax egg instead?
cheers Fee
Brisbane, Australia
Sarah
I made this last night with homemade cashew nut butter and after letting it sit overnight in the fridge, I had 2 slices this morning cold with crunchy peanut butter and homemade raspberry jam. It was utterly delicious!!! Can’t wait to try it toasted, with sandwiches… the list goes on! Thanks so much for another wonderful grain free recipe! You are a genius!
Against All Grain
So great to hear Sarah! And Thank you!! 🙂
Against All Grain
I fear I have failed you guys!! I left out a CRUCIAL step in the bread recipe. I guess I got too excited to share it with you and totally missed the scribbles in my notebook that beating the egg whites separately really helps the loaf rise. Good thing I’m not getting paid or I’d be fired! 🙂 Anyhow, thank you for all of the lovely comments for those of you who have already made it. The bread tastes the same either way, but it gets about twice as high if you beat the whites separately. Here’s the link with the edited instructions! Oh and I upped the almond milk to 1/4 cup because beating the whites separately makes it a little more dry. My apologies!!!
Deb
I did not see the link with the edited instructions. I want to try this bread. thank you.
Against All Grain
The ingredients and instructions above are the correct ones!
Krystal
I just discovered your site and am so excited! I tried this recipe today. I used homemade cashew butter and used a metal pan, oh and I used maple syrup as a sweetener because that’s what I had on hand. My loaf looked great but really shrunk as it cooled. Any suggestions? Thank you!
j3nn
Wow, that looks awesome!!! Nice job 🙂
zoey
i was wondering if you could make this with a different kind of nut butter. i cant have cashews : (
Against All Grain
From Amber on Facebook:
Hi Danielle. Thanks so much for adding in these notes. My bread looks like the right one, so I’m excited to make it again. This bread is incredible. I’ve been eating it all week and making SANDWICHES!! I’m just so tickled. A true SCD sandwich – wow!. You’re so awesome lady. Thank you, thank you for this recipe. I’ll let you know how it goes and rises with your added notes. 🙂 have a great weekend.
Against All Grain
From Kelly at The Spunky Coconut:
“Holy moly! AWESOME. The whole family LOVES it!!!”
GiGi Eats Celebrities
NOW THIS is purely inventive! I am so impressed!
Lucy
hi There – i’m from the UK – does anyone know what a cup of cashew butter is in grams? And do you know if I can substitute half for butter? It’s just that it’s just SO expensive here to buy or even make your own. Anyway, I guessed the amount, and it came out really quite brown inside – rather than white – do you know why that might happen?
Thanks – would be grateful for any advice! Thanks, Lucy
Against All Grain
Hi Lucy – I’ll be making a new loaf tonight so I will weigh the cashew butter for you before I throw it in. I would not sub regular butter. You could try another nut butter. I know some have had success with macadamia butter. Just make sure whatever nut or nut butter you use is skinless.
Megan
This is the best recipe I have tried thus far! My bread color turned out more “whole grain” looking. However, the taste was delightful! This recipe is genius!
Des Ware
Hi Danielle. Thanks for the recipe, going to try it out, question, storage and shelf life, whats the best way to store this bread and for how long can you keep it? paper bag? 2 days? Thanks.
Against All Grain
I just tightly wrap it in cling wrap. You could wrap it in parchment first and then cling wrap or a ziplock to soak up moisture if you’d like. I keep it in the fridge.
Des Ware
Thanks for that, and for how long approx do you keep it for? you eat it normally within 3 days?
Against All Grain
We keep ours in the fridge and it usually lasts us about 4 days before it’s gone. I think it would be fine up to a week or so.
Tim Rowe
I suffer from Gout and looking for change. This recipe looks fantastic. The fact that its Yeast free and made with apple cider vinegar makes it look very promising. My only problem is I wouldnt know where to shop for apple cider vinegar, Almond milk and cashew butter.
All the healthy stuff I need is not found at my local supermarket 🙁
Against All Grain
Try Amazon! Unless of course you’re in a country where they don’t deliver…
Grace
You should be able to find apple cider vinegar in the same spot at the grocery store that you would find white vinegar.
As for almond milk, if you own a blender, it is really easy to make yourself. take 1 cup almonds with 2 cups water and run in the blender till the almonds have been finely ground. Then using something like cheese cloth or a paint strainer bag strain the milk. In my opinion homemade almond milk tastes better then the stuff you get from the store. Plus if you save the pulp after straining you can use it for almond flour.
Cashew butter if you don’t have a food processor to make whole cashews into butter my guess would be try your local health food store or co-op and if that fails order online. I am sure google can help you find a site that sells it.
Hope this helps
Kyli
Would using roasted cashew butter affect the outcome of the recipe?
Against All Grain
I haven’t tried it but I wouldn’t suggest it. Roasted will have extra oil in it plus roasted cashews have a much more distinct flavor.
Caroline Lunger
can i use coconut butter instead of cashew butter?
Against All Grain
No it won’t work. Coconut butter is very different
Laura Bickmore
Is there a big difference between baking it in a glass pan vs a metal loaf pan?
Thanks! 🙂
Against All Grain
I just had my loaf burn with the metal but if you line it with parchment you’ll probably be ok.
Blanca
Tried this recipe yesterday and it turned out yummy.. Thank you 🙂
Bryony
I just baked this bread and it worked out perfectly, and tastes completely delicious!
Thank you for a brilliant recipe
Against All Grain
From Jami on FB:
I’ve been meaning to write for the past few days…..I made your sandwich bread at the beginning of this week, and it was pure HEAVEN! I made a PB&J the next day with it — straight out of the refig, and it was wonderful! Thanks for your time and committment to the SCDiet. Those of us with UC surely appreciate it!
Morgan
I made this today and it was wonderful! I will definitely be making it again. I made my own cashew butter with my vitamix and it seemed to work out well, although my bread wasn’t as light as yours.
Sarah
Can I use organic sunbutter to replace the cashew butter? I really want to make this bread but my son is allergic to cashews!!
Sarah
Heidrun Schaller
never mind! please delete my comment. I don’t know how I missed it. Duh!
Against All Grain
You had me worried at first! ;-D
Nikki Myers
My oven has a vent (more like a 1 1/2 in hole) through one of the burners. Should I worry about too much “steam” escaping. Or will it be fine if I just don’t open the oven door. I know most ovens have a vent, but just wanted to double check with the Master =P
Thanks
Against All Grain
I think you should be ok!
Catherine
Nikki–
My oven also has a vent and I do think it affects the bread a wee bit. Not enough to be frustrated or anything, but my oven is old and I can’t wait to get into a more modern kitchen with this recipe! It’s yummy anyhow, I but I like weighing the baking variables! 🙂
Monifah
Ok.. First time i made this it turned out ok but not fanntastic, i had spilled some yolk in my egg whites and they didn’t get stiff and i had made my own cashew butter but it was too grainy.. Enjoyed it anyway 😉 BUT…………. Now i made it again, added coconut oil to my cashews while making so the butter got ubersmooth, my egg whites were beaten to perfection and W-O-W. Now this bread is FANTASTIC!!!! Fluffy, nice and high and tastes soooo good. Glad i made it again!!! So thanks, this will be a great weekend, haha..
Against All Grain
Yay! So happy you liked it. Yeah be careful… you may consume the entire thing!
pamela
Hi! I can’t wait to try this!! Can you tell me what type/brand/material loaf pan you used? Also, I was reading in the comments that you beat the egg whites separately and add more liquid and you have a link to click on this updated version, but I could’nt find the link?? I might be confused…
THanks for all your hard work!!
Against All Grain
Hi Pamela! The updated notes are already incorporated into the recipe. I use a glass loaf pan but it doesn’t have a brand on it! I think some have used a non stick loaf pan and had good results as well. The size that I use is listed in the directions. Let me k now what you think!
Diana Batema
I’m intrigued by the gf/df paleo bread, but I cannot have cashews (migraines) or almond milk (migraines from the corny additives). I read thru the notes and you don’t recommend subbing almond nut butter for the cashew butter because it won’t rise enough. What if I add another egg white? 1/2 tsp more baking soda? I plan to use coconut milk in place of almond milk.
Against All Grain
Coconut milk will definitely work or you can make almond milk fresh at home and it won’t have additives. I know people have had success with macadamia butter. Otherwise I would use blanched almonds and blend them into a butter. I think it’s the skins of the almonds and that most of the almond butters are roasted that makes it have problems.
Amy
I finally had all of the ingredients to make this today – I could not believe how great it turned out! I only had baking powder instead of baking soda, but it was fine. I tried almond flour bread awhile back, but it didn’t turn out for some reason. My brother even loved this!
I’ve been grain free for about two months now and it was so nice to have a sandwich.
Thanks for posting this! It was so easy to make and turned out exactly like the pictures, which never happens for me.
Terri Langerak
Danielle, I love you!
I made my first loaf yesterday, & it came out perfect!
I just made sandwiches from it, I made 4, since the slices are small, 2 for me & 2 for my man, Tony. I toasted the bread for half of them, just so we could try it both ways. We had smoked Turkey sandwiches (junk free, no preservatives, etc), & they were awesome! The toast smelled SO wonderful, & the untoasted bread had the texture of banana bread. I cut the sandwiches in half, to make sure they didn’t fall apart.
I feel so grateful to you right now. I’ve grown tired of lettuce wraps, & almost every ‘paleo’ bread I’ve made has been way too dry, or too heavy on the coconut flavor. I’m thinking I’ll try making a loaf with cinnamon next…
Thanks again, & keep posting your wonderful recipes! There are so many I want to try!
Terri Langerak
http://www.harpsinger.net stop by & let me play my harp for you!
Madeline
Made this bread and had a few questions. I didn’t use the same brand of cashew butter as listed in the recipe but it was the only one at the store. It seems like a nice raw cashew butter. The texture is very nice, soft and fluffy. The only thing is that is has an odd scent that I don’t find appetizing. Mine turned out brown like whole wheat. Did I do something wrong, or is there an improvement I could try?
2boys2joys
I had the same issues and just posted the same question. 🙂 Glad I wasn’t the only one.
Against All Grain
Hi Madeline and Danielle- Sorry it took me so long to respond. As long as your cashew butter is raw you shouldn’t have trouble. The scent may be from the apple cider vinegar or the scent that cashews get once they are cooked. As for the brown color, putting in the egg whites last and not over mixing them is key. I’ve had the darker color too a few times when I’m not paying attention and I can assure you that it tastes the same so don’t worry about that. If it is not rising, you are either not beating the whites long enough or you’re over mixing them in so they fall. Before, when I forgot to beat the whites separately, I got a loaf about half the size of what I normally get so it really does make a big difference. Hope that helps!
Charity
Mine turned out darker brown as well using a store bought cashew butter. I didn’t read the label very carefully, so I suppose it may not have been raw. Regardless of color it was delicious!
Laura Moseley
Would love to see the Thermomix conversion! Perhaps post on https://www.recipecommunity.com.au for all to see.
Tiffany
I have just made 1/2 loaf of this bread this morning and it is awesome…By far the best Paleo bread I have tried to make (and I have attempted several). The only difference for me is that I only had a nut butter blend in the pantry (cashew, brazil and almonds) so my result is a little darker but the taste is amazing, and there appears to be no problem with it rising, I was very gentle when folding it all together to keep the egg whites nice and airy…my kids are wrapped and I am sure my hubby will be too! Can’t wait to have a toastie and my 5 yo daughter is already excited about the prospect of taking a real sandwich to prep school on Thursday!
Taylor
thank you so much for this recipe! I have been eating a paleo/primal diet for 6 months now, and this is by FAR the best recipe for ‘bread’ I have found. I have made it 5 times now. My only problem is I can’t stop myself from eating it — it’s so fabulous! I look forward to trying more of your recipes!!
Against All Grain
Thank you Taylor!
Manda Panda
Making this right now with Sunbutter instead of Cashew butter 😀 I also use whole milk instead of almond milk. Cannot wait to try it!!! 😀 😀 😀
Katie Pierce
Danielle,
Hello, very excited to try this recipe! I am however notorious for changing ingredients, though after reading all the post here that may not work this time. Can you tell me why butter does not work? Is there a quality that the cashews have that make this work, and can I use dairy milk. Thank you for your assistance. Have a great day!
Against All Grain
Hi Katie- I’d stick to the ingredients and measurements as is. Dairy milk will probably be fine but I wouldn’t change anything else. I’ve made tons of other bread recipes using different ingredients as well as testing this one various ways dozens of times and this is the one that works.
Katie Pierce
Thank you for your time it is appreciated!
Deanna
I took your recipe, adapted it, and made a nut and coconut and sugar-free version. I’m on an extremely limited diet right now, and it was such an amazing treat to eat a baked good. Thanks so much for posting this recipe.
Would you mind if I blogged my adaptation (with credit to you for inspiration, of course)?
Against All Grain
Of course not!
Erin @ Texanerin Baking
You know what? I like this bread so much that it’s now the only bread I make for my breakfast. I’m even going to post a link to this recipe on my almond flour bread recipe so that people come here instead. This is just better!
I made half of this recipe once and it was no problem. But it just makes sense to make a whole one and keep it in the fridge!
Against All Grain
So good to hear Erin! Thanks for sharing!
Brenda Noyes
WOW!!! This bread is AMAZING! I was very skeptical, but this bread was delicious! Only change I made was that I did not have the full cup of cashew butter so I used 3/4 cup of cashew butter and 1/4 cup of coconut butter. You may possibly be my new hero 😀
Against All Grain
Thanks Brenda so happy to hear it! Please spread the love and share the recipe so more can enjoy it too!!
Cami
This is delicious. Thanks for a kid approved
Recipe! We love it and use it for everything
Now. 🙂
Karen Larimore
I just made this and it’s fantastic! It’s not quite as tall as yours, so next time I’ll beat the egg whites longer. I’m experimenting with gluten free foods for my son who has ADHD and tested as highly sensitive to gluten. We ate out last night and he had his first gluten free pizza. He ate it, but wasn’t too happy with it. I’ve also been trying lots of pancake recipes and have yet to find one that we all love… (I sometimes like to add mashed bananas or pureed pumpkin to my batter.)
Just curious… Do you think this recipe could work as a pizza crust, or perhaps pancakes?
Against All Grain
Hi Karen! It may work as a pizza crust but as you know, it’s a little runny to form into a circle. Maybe a deep dish? I do have a pizza crust recipe that’s coming out soon that has the same overall concept but it uses some almond flour as well. I love it.
I have a banana pancake recipe on my site! Just search for it and it will come up. It’s awesome!
Gaby
Thank you so much for your well written recipes!! I’m new to the ‘Grain-free” life so bread I have been missing ALOT! I have tried your other recipes and they are awesome!! Thank you for all of your time and efforts for all of us:)
Cecy
So I stumbled upon this website about 3 days ago via pintrest and I have been coming back every day looking at your recipes. I made the bread last night and the blueberry preserves this morning and it was DELICIOUS!!! I think I may have over mixed my eggs into the cashew butter mixture wish lead to a smaller, denser loaf but it was still out standing. The blueberry preserves were simple and delightful I was able to get them made before leaving to work. Thanks for the recipes Danielle!
Against All Grain
Thank you Cecy! So happy you you like everything!
Patty Cakes
I made this wonderful bread with homemade macadamia nut butter (added some coconut oil to it). I didn’t have a glass bread pan so I ended up using mini loaf pans. This was a terrific recipe. The next time I make it I’m going to add chopped dates to it. I thought it was good both cold and fresh out of the oven. You are a wonderful “recipe maker”. Love your style and ingredients! Thanks for your hard work.
Rachel
Definitely the best grain free bread I have made! I used homemade cashew butter and have been eating it toasted with butter. My 4 year old who has never liked grain free breads is asking for it with honey.
Jennifer
You have no idea how excited I am to have found you. Going to make this in a few minutes. I have not had a baked bread item in so long that I am shaking with anticipation! I cannot wait to play around with variations too.
scott
my loaves always turn out about 1.5 to 2″ thick despite following directions to a tee, getting egg whites nice and fluffy etc. The one difference might be the metal vs. glass loaf pan. Could that be it or any other suggestions?
Lisa
This is the best paleo bread I have made so far. It is light and fluffy and moist. I just made it.. I was out of coconut flour and almond milk, so I used flaxseed meal and coconut milk, it is amazing. I kept the ratios the same. Very, very tasty, you just made my family and I so very happy!
lisa
I just tried to make it with sunflower seed butter. It worked, but was not as good as the cashew version. The strange thing is that it turned bright green in a few places. Does anyone know why this happened? I assume it is some type of chemical reaction. I changed the following ingredients:
Coconut milk for almond milk
Flaxseed meal for coconut flour
stevia and honey
sunflower butter for cashew butter
It was slightly more dense and didn’t rise as much. I also used cream of tar tar when mixing the egg whites to really stiffen them up.
Against All Grain
It’s the sunflower seed’s reaction to the baking soda. You can reduce the baking soda and add a little lemon juice to help counter the problem.
Drea
THIS IS SO DELICIOUS! Thank you, thank you! It’s so exciting to eat bread again. 🙂
Lunchbox
Oh. My. Gosh… I made this bread yesterday and a great big batch of your blueberry jam. I sat down this morning, brimming with excitement as I made myself a “PB&J” (or in this case, an almond butter and blueberry jam) sandwich. Instantly I was transported back to being 5 years old when my mom used to make me a PB&J every morning. The only difference is that I left my crusts on!
Cat
Wonderful recipe! I made it this morning and we all love it. The only question I have is that when it came out of the oven it was tall and beautiful. It quickly fell in the middle (not too much but definitely a dip in the center). I’m just wondering if I should cook it a bit longer or if there is something else I should do. FYI, I’m at 6000 ft so perhaps that caused the fall. Thanks again for a wonderful recipe!
Deb
I am at between 3 & 4,ooo ft, will this make a difference in the grain free bread.
Against All Grain
I’m not sure sorry. I’m not familiar with altitude baking. I’m sure a quick google search can help you out though!
Cat
So I did do some research and found that if you reduce the amount of baking soda then it will solve the problem. I cut it in half but at lower altitudes you may want to try a 1/4 tsp less to start. I’ve now made it four times and we just love it. Thank you so much for this wonderful recipe!
Heather
I made this yesterday and holy oh my goodness i almost ate the whole loaf already. 🙂 I wondered if you had a calorie/carb break down of this and how many slices you sliced? i’m a carb/sugar watcher. Thank you SO SO much for this! I have missed bread
Lauren
Hi there
I recently found your site and have really been enjoying it, all of the recipes are beautiful.
I just made this bread for the week, it turned out very well though I personally find the cashew taste to overpower it a bit, but once I pile on butter and jam or something savory it seems to mask it..great texture for grain free though, you created something really amazing.
I just have a question..when I toast this bread it tends to burn quite quickly and I’m wondering if you are ever worried about oxidation when heating these nut based baked goods? I’ve heard countless things about having too many omega 6s in diet and nuts have a lot and when they are heated they may oxidize making them potentially rancid or carcinogenic. Do you have any thoughts on this? Sorry to be a downer, I don’t want to rain in the parade because your stuff is awesome, I’m just curious what you thought. I guess one answer would be not to eat nut based stuff every day but it’s hard not to when you’re grain free!
Thanks for all your hard work and gorgeous website!
2boys2joys
Hi Danielle! I made this bread today and have some questions. My bread turned out brown inside almost like a whole wheat color. I didn’t buy Artisana cashew butter but did buy another brand that was creamy and the exact same color. Any idea why it would have turned this color? Also, mine didn’t rise hardly at all and I didn’t open the oven. Could the color be different because I read the directions incorrectly and put the egg whites in FIRST and then the dry and THEN mixed it all up together in my mixer? Any help would be great, I’m a little disappointed. 🙁
Danielle
scott
@2boys2joys – I had the exact same results as you and I’ve made it three times now… Tastes good, doesn’t rise (and I have followed directions minus the metal pan), brown in color just as you describe and not like the pictures. Tastes good and I like it but wished I could get a reasonable size slice of bread out of it.
scott
just read more of the comments – my guess is my problem is that I over mix the whites in… they clearly fall when I”m mixing. So the challenge I guess is to make sure the ingredients are mixed enough but such that the whites don’t fall… I’ll give it another shot
Deanna
One suggestion would be to take a portion of the whipped egg whites and mix them into the other ingredients first – which will lighten the whole mixture, and then fold in the rest of the egg whites very gently. The first portion of egg whites will deflate more, but then the second portion should remain fluffier.
andi
Has anyone out there found a way to do this bread with out eggs? I am fairly new to SCD, and also must strictly avoid eggs. I’m dying for something that even resembles bread!! Any ideas or successful experiments???
Cheryl
This bread is really great, definately the best grain free bread I’ve made so far! Thank you so much for all of your hard work, it is REALLY appreciated!
Leah
This looks amazing – cant wait to try it!
Kathy D.
I love you!!! Finally a Paleo-friendly bread I like! Today I had tuna salad…..on toast. TOAST! 🙂 Mmmmm, my tummy’s happy now 🙂
Lauren
I finally got to make this yesterday. After nearly falling over from sticker shock for the cashew butter you recommended ($24 for a 16oz jar here in Hawaii), I opted for the less-expensive option of making my own at the nut grinder at Down to Earth. I added some coconut oil and incorporated that to make it smoother once I got home. The bread was only half the height of the one shown here and more yellow… but the flavor was really good! I followed the directions to the T – with just one exception – and that was unsweetened coconut milk in lieu of the almond milk. Not sure what I did wrong… or maybe my baking powder has lost its zing. ???
Vivian
Just took my first loaf out of the oven. It was SO good in the bowl that I KNOW it will taste delicious sliced! I am so glad to find a bread recipe that I can actually bake in my own kitchen! Thank you so much!
Judy
Hi there,
I am looking forward to baking this bread – sounds fantastic.
Does anyone know where I can buy “raw” cashew or almond butter in New Zealand. Most I have seen are lightly roasted.
I appreciate your help.
Judy
Alexi
I can’t bake. This is the first bread I’ve ever made and it was PERFECT! I even prefer it to regular bread. It was light, fluffy, moist and kept in a bread bin perfectly for a few days. I’ve missed bread on my paleo diet and this has definitely filled the spot! Thank you, thank you, thank you!
Erin @ Earthenergyyoga
This is the best looking gluten-free bread I have found! Going on a road trip soon so I will definitely be trying these out! Thanks for the recipe
liese
I can not wait to try this recipe! My soon to be 4yr old son is Autistic and a very, very picky eater… I’m hoping he will eat this bread. I will be making the butter from scratch, i’ve a lovely Vitamix blender.
other gf breads are just too dry for him i think.
Liese
Can the bread be frozen?
hcgdietvancouver.net
Very good blog! Do you have any suggestions for aspiring
writers? I’m planning to start my own blog soon but I’m a little lost on
everything. Would you propose starting with a free platform like WordPress
or go for a paid option? There are so many options out there that I’m completely confused .. Any tips? Kudos!
Nicole
Hi I made this today and it was fantastic, however my hubby thought the taste of Cashews were to strong. I think I will try the Macadamia Butter next to see how that fairs. I will be making french toast tomorrow so we will see how he feels then
fanona
Wonderful! I made substitutions as I didnt have cashew butter and didnt want to get the food processor out or clean it or the vitamix to make some. I used half and half commercial almond butter and tahini. I used all egg whites thinking to cut the fat level down..but found that the nut mix was too dry so added some walnut oil so it would mix better. The toughest thing about this recipe is getting all the goo off the beaters. I was concerned that I had overmixed but the texture is fine and slices really well and is not too ‘sqeaky” from the egg whites. I will have to remember to use a deeper bowl for that last mix all in. The color is that of a banana bread as is the height..not all that different from many gluten free commercial loaves. i used agave (it was the most handy) which I know adds too much for scd and it is not too sweet but i do think some sweetener is probably a must unless being used w jam or fruit. I wonder if doubling or tripling the recipe has any “watch out for” s…Author??
pregnancy hormone
Good day! I could have sworn I’ve been to this blog before but after looking at some of the posts I realized it’s new to me. Regardless, I’m definitely delighted I found it and I’ll be book-marking it and checking back regularly!
Natalya
I reckon this bread could convert gluten eaters:) It looks really do- able, thanks! *
Leah
Finally got round to making this tonight and it was awesome! I substituted coconut nectar for the honey and it worked out very tasty – thank you!
Gayle
Can this be made with almond flour instead of coconut flour? And, if so what would be the difference. Thanks.
Cara Roth, RHN
I just made your bread and thought it was fantastic! Recommended to me by a friend 🙂 I wrote a review on my website, nourishbycara.com Thanks for the great recipe!
Celesta
THANK YOU!! I LOVE this recipe! Yes, it’s expensive to make but it’s amazing. I’ve been missing bread so much! I can’t wait to ‘re-visit’ some of my old favorites. Grilled cheese, here I come! Thanks again! So glad I found this website 🙂
Rox
Danielle I just made this bread and it came out GREAT! It tastes much more like bread than I thought it would! Thanks so much for perfecting this recipe- the hubby and I are eating BLT’s for dinner thanks to this awesome recipe!
Ingrid
You are my hero! I am utterly shocked by how delicious this bread is. My little boys who are on SCD are eating nice warm bread for the first time in over a year! Thank you for all you do to share your talents- you really are making people’s lives better with your wonderful recipes:)
Kara
Thank you so much for sharing your recipes. This is my very FAVORITE bread recipe! I’ve made it according to recipe, and it was wonderful; however, I once had to make it with almond butter instead of cashew, and it still turned out great. I’m going to try your hamburger buns next! 🙂 Thanks again!
Monique
I was really happy with the texture and taste of this bread. I actually ate it just plain and sliced because I wanted to see how it truly tasted and the taste of the cashews was so mild. You can’t taste the coconut at all and this ACTUALLY tastes like bread. I brought it to the cottage this past week and almost all of the loaf was eaten by my family and I. My only issue is that it didn’t rise much. It was only about half of the height I’d expected. What are your tips for tweaking the bread to rise a lot? I beat the egg whites heavily with my mixer (would over-beating cause a problem?). Would you recommend adding a tad more baking soda? Thanks for the recipe and for your time!
Marianna
Thank you so much for this amazingly delicious recipe! I just had my first piece of this bread and it was so good! I am going to make a grilled cheese next! Thank you again, for sharing your recipes! =)
Chris
This is, by far, the best grain free bread I have ever had. The kids loved it too. One weird side effect was that the top of my bread got a little green after cooling. I noticed my batter dish residue got green as well. Strange. I substituted coconut milk and sun butter, so I’m not sure if that had anything to do with it.
Against All Grain
Your loaf will probably turn bright green tomorrow. It’s from the sunbutter and a reaction to the baking soda. There’s a few ways to combat it – just search google for it.
Diane
I just put this in the oven. Even the batter is yummy. Have you tried it with any other butters or is there something special about cashew butter that makes it work best?
Loll
I made this bread over the weekend and it’s the best grain-free bread I’ve tried! Thanks so much for posting the recipe, definitely one I’ll use again.
Charity
This bread recipe is a game changer 🙂 I had bookmarked this link a couple months ago and then sat on it. A few weeks ago my hubby and I were joining a large group of friends for a beach house weekend. Our friends did a great job of making meals friendly for us (Paleo). But the easiest thing for a large group of people for lunches are sandwiches. And honestly, I didn’t want a lettuce wrap 🙂 I pulled this recipe out from hiding and gave it ago!
It is amazing! My bread came out looking a little more like whole wheat (I think it may have been the brand/type of cashew butter – I didn’t look closely to see if it was roasted). Mine didn’t rise as high, but there is a good chance that was an eggs were an issue ( I don’t have a way to measure size) or a baking soda issue – turns out the one I have at the house is WAY too old! But the bread was moist and just… perfect! I was so proud of it, you’d think I had invented it 🙂
We ate delicious sandwhiches at lunch and toasted some up at breakfast and spread some raw honey on it! Everyone was so intrigued especially when learning that cashews are the base of it. We had lots of requests to try a piece and everyone enjoyed it! I was cutting the smallest pieces for people to try 🙂 I had a hard time giving it away!
I’m super excited to make it again for our upcoming camping trip. I plan to make your blueberry preserves as well because that just sounds like a delightful camping indulgence 🙂 Thank you for being innovative!
Teresa
This looks great! But I’m on a candida cleanse and can’t do honey. Will this work with stevia (liquid or powder), or would that change the texture?
Thanks!
Teresa
My apologies, I see that the stevia question was already asked and answered!!
Cindy
Hi, I tried this recipe twice this weekend – first loaf rose, but as I had oven on too high, I opened it up too early to check -skewer came out clean, loaf had risen – but then it sank… was expecting it wouldn’t rise at all as egg whites didnt’ whisk to peak in thermochef (i left the bowl with too much moisture) – so was surprised when it did start to rise… 2nd loaf – the cashew butter I made wasn’t quite a smooth as first batch – but egg whites were perfect – and it rose & sank in the oven – soooo disappointed – any thoughts on what I’m doing wrong????
Misty
Do you have the nutritional info on this?
Cheryl
This is such an awesome site. My husband and I have been Paleo for a year and a half but I could never find the right recipe for bread! I miss my paninis! I’m just waiting on my order for almond flour from digestive wellness and I can finally try this fabulous looking bread and your other recipes! Thanks!
Caitlin Rosenquist
This bread is awesome! It’s so nice to have toast and sandwiches again!!
Joey Morman
I made this yesterday and I am BESIDE myself with JOY!!! This bread is SOOOO good and I am ecstatic to have it to make sandwiches with. THANK YOU!!!!!!
Mary
This looks good.. can’t wait to try it. That cashew butter is AMAZING. I get all their products but where I am it close to $20 a jar ! I hope this comes out well if I am going to use a cup of it ! 🙂
Iona
YES!!!!! At last a bread that is yummy and easily made at home. NO STARCHEs of any kind! Fantastic and simple, just follow the instructions and you can not go wrong. I am not a baker and I got it right. This was perfect. The Egg Whites are the trick! If I can do it anyone can. It is delicious 🙂
Victoria Meyers
Thank you for posting this amazing recipe!! I made this using the Almond butter that is locally available to me at wal-mart – because I read all the comments before hand I first put the almond butter into my mini processor with a little grapeseed oil and pulsed it till it was super smooth. I whisked my egg whites with an electric whisk in a copper bowl, (the copper creates a chemical reaction with eggs that makes the perfect egg peaks btw) and I even forgot to put the baking soda ( I actually used baking powder) into the dry ingrediants, it was while I was mixing the dry ingredients with the wet (before folding in the whites) that I realized I had forgotten it, so I put 1 teaspoon of baking powder into a glass with 1 teaspoon of warm tap water – mixed it quickly and threw into the mixer bowl – then mixed it up real quick. I followed someone’s suggestion to put a spoonful of the eggwhites in and mix fast before folding in the remainder. Now as for the color, my almond butter is a dark color, it is the largest ingredient in the batter so you can’t expect the bread to turn out lighter than the batter, can you? My bread turned out the same color as the batter, and I am amazed the bread actually has holes like the old gluten laden bread always did! Wow! I wonder if it could be made with peanut butter? I know that peanuts are legumes, but I don’t have a philosophical reason for going grain free. I just feel better this way and my son is GFCF because it helps with his autism symptoms. Grain free paleo diet is actually cheaper than standard GFCF diet. Which is why I mentioned peanut butter since it is much cheaper than almond butter. Anyone here familiar with the Food Stamp Challenge? My family has lived the “challenge” for the last 12 years. A dollar a meal per person is the average food stamp budget- that’s why we rarely eat more than one meal a day. Great recipe- amazing ! I love it. 🙂
Teresa
Absolutely delicious! I have Celiac disease, and this is the BEST gluten-free bread I’ve ever tasted. Being new to Paleo, I couldn’t face all those eggs, so I used three eggs and one “flax egg”–1T ground flax and 3T water. I wanted the extra fiber, too. The taste was incredible, but what I really couldn’t get over was the crumb. Although the bread felt a bit moist when it had first cooled, it was completely cooked through, and the moistness went away as it sat. It’s not chewy like wheat bread, but the nuttiness of it makes it wholly satisfying. Thank you!!
Charmaine
Just made and its unreal!!! Thankyou thankyou thankyou. Will be making each week!
LRobinson
i just pulled a loaf out of the oven and it looks and smells wonderful. I was wondering how this does in the freezer? It would be nice to bake several loaves and freeze for connivence.
Against All Grain
It freezes great!
Teresa
Actually, I’ve found it gets a bit soggy when you freeze it. I’ve been putting half a loaf in the fridge and half in the freezer, and using both up within a week. Longer than that, and I think it would soak up too much moisture, even well-wrapped.
Against All Grain
I’ve heard from people that freezing it in individual slices works best.
Ingrid
I actually make it into muffins in cupcake liners and freeze them for my son’s school lunches- it is SO convenient and he loves his ‘muffin sandwiches’:)
Julie
Hey there. Just starting to make this bread. My eggs only weight 3 ozs each in shell – not 9! Must have been huge eggs. So, should I tripple the eggs? That would 12! doesn’t seem right…help!
Also using metal pan…bad idea?
Trading up the milk for hazelnut milk, as my daughter can’t have much else.
Any insights on these thought?
Thank you SOOOOOOO much1
OLane
I’m sure you’ve heard this B4 but thank you so very much. I made this after trying 3 other recipes that jst didnt work. I made our bread w/Rice Milk & home made raw cashew’s purchased at Trader Joes. whipped up the butter in my food processor & baked with my fingers crossed. I wish I could post the picture. It looks SO good. U R a genius! Will U be posting the nutritional value as well?
1/4 cup of raw cashews is = to 170 calories (100 from fat) and I used 1 cup.
so triple the calorie to 680 (600 from fat) & coconut flour is 62 calories per 2 table spoons (15 from fat) & I used 1/4 cup. (4tbl in a 1/4 cup) that would be 124 calories & (30 from fat). Just helping out with the numbers. if I’m wrong…Please someone correct me : )
Allison
Hi there
Dumb question – is the cashew butter measurement a liquid cup measure or a dry cup measure?
And did anyone work out the equivalent in grams? That was mentioned in comments but isn’t in the recipe details.
I have bought the Artisana cashew butter but don’t want to waste it unless I know exactly what I’m doing.
thanks
Allison
amber
Hi Allison,
I do measure mine. I measure out 8 ounces of cashew butter. I will do the grams next time I make it.
Bambi
hello could you please tell me in your bread recipe if there is an alternative to apple cider vinegar? i have been gluten free a long time and dont eat fruit because of its effects on me. Will baking this cider vinegar burn away the fructose in it? thank you so much for your reply and i love your blog/website
Have a truly wonderful day!
Against All Grain
hi there- you should be able to use any acidic ingredient. Lemon juice would be my first alternative, but that is probably out as well
Rachael
I made this bread yesterday and had a PB&J with it for lunch today. Thank you SO MUCH! I was afraid of it tasting *eggy* but it didn’t and it was wonderful!
Teresa
I didn’t read through all the comments, but has anyone tried making this with coconut butter? If so, how did it come out? I might subbing coconut butter and milk since my daughter’s pre-school is nut free…
Rachael
Hi there. I made this bread and love it!!! How long does it last in the refrigerator? I’m hoping a while? like 1-2 weeks or more?
Rachael
Against All Grain
It will last about a week. You can also slice it and freeze individual slices
Cassidy @ Cooking Gluten (& Dairy) Free
I made this yesterday and it was awesome!!! Thanks for the recipe 🙂
Stacey
Thank You so much for this awesome recipe! I am new to this diet and have been completely overwhelmed! I have been off of dairy for 20 years & gluten & soy for 12, but this diet is a whole new experience! Finding your blog has been wonderful! I have tried a few recipes and have loved them all! My hubby has joined me & to my surprise he is liking it. We both loved the bread! It has more moisture than regular gluten free breads! I love that it does not have yeast too! My hubby loves his bread so this is great for us! I regularly bookmark, pin & print your recipes! I have a few that I am dying to find the time to make! Thank you for all of the hard work you do to try these recipes and post them for people like me who are very overwhelmed with this diet. (SCD)
Mommycap
Made this bread with Sunbutter and while cooling it turned this amazing green color!!! My kids now call it the green bread. With a little chocolate hazelnut butter, OMG what a treat and fun too!
Jennifer
This bread is a lifesaver and WONDERFUL! I’ve made it 6 times in two months and have used it for everything bread related…including at breakfast on a family vacation. Thanks for being so creative!!
Jan
Any chance this could be made in a bread machine? Any one know how to convert recipes?
Thanks, sounds promising!!!
Caroline
Hi! Thank you so much for this recipe–I was thrilled to see beautiful photos, votes of confidence, and a very short ingredient list!
I subbed buttermilk for the almond milk, and otherwise followed everything exactly, including artisina cashew butter. It rose BEAUTIFULLY–arguably better than some bad grain-and-yeast based breads I’ve tried in the past. Just wanted to let everyone know that if you aren’t dairy-free, buttermilk works beautifully.
– A couple of other notes that I think assisted in making this batch a success:
I preheated my oven an extra 10-15 minutes and let it cycle up to 325 twice before putting the loaf in and reducing to 300.
– I mixed the whipped egg whites in 1/3 at a time
– I used a metal loaf pan of the same size, but made sure NOT to put it on my pizza stone, as that would surely burn the bottom, though it would help the rising; parchment on the bottom along with coconut oil on all surfaces
Sherry Hamilton
I made this bread in prep for going grain-free for 6 weeks. My second day of restriction, I fell in love with it! Cold from the fridge, it tastes like a light pound cake. It toasts well in a toaster and I top it with fruit-sweetened preserves at breakfast with eggs. It works, and I’m already planning to make more. Thanks!
Jason
Yeah, I would like to know if this could be made in a Bread Machine, too. Thanks!
Thomas
Is Wiki rightin saying that 1 American cup is equivalent to 2.4 dl?
rufita
I used almond butter and did not separate the eggs. Basically just mixed everything. I also used real milk, not off dairy yet. This bread is awesome.
Dem
Absolutely delicious bread!!! I shared it with only a few people (as I wanted it all for myself), but they all loved it as well. Thank you very much 🙂
lisa
I just made a double batch + it turned out great…had to add a bit more almond milk to the wet ingredient mix to have it stay as a batter rather than pasty, also used tin pans but lined them entirely with parchment paper. Even with raw cashew butter, mine turned out dark- rather like pumpkin bread (as with other posters). Thanks so much for this recipe, am a newly-minted Paleo diet fan + am really missing all things bread + baked. What a treat!
Craig
I tried this using regular butter and it was great dogfood.
Against All Grain
Butter and cashew butter are two very different things. One is made from cream and one is made from ground nuts.
Patty S.
Wow, considering your lack of following directions and not knowing there is a difference between ALMOND BUTTER and Butter your post is just ignorant.
But I bet your dogs get a lot of the foods you attempt to make.
Meghan
Would this recipe work with almond butter instead of cashews? I have a tree nut allergy, but for whatever reason I can eat almonds (thank goodness!)
Jessica
This sounds great and can’t wait to try it! It looks amazing in the picture! Do you think this mixture could be fermented before baking? Thank you for your site!
Em
Sigh. Had no idea that I had to clean the blender blades before mixing egg whites (or beat them before mixing egg yolk/ cashew mixture) so didn’t get stiff peaks. Have no idea how it will turn out now 🙁
Against All Grain
You won’t be able to get stiff peaks with a blender. You need a whisk, whether it’s a stand mixer or electric hand beater. And yes, any yolk will keep the whites from stiffening.
Julie
Accidently picked up roasted cashew butter instead of raw cashew butter. Bread turned out great. I have lost all reference to “real” bread so I thought it was wonderful anyway but probably not as good as Danielle’s recipe. I will try again after getting raw butter (or making my own). I thought I did something wrong because the mix was so dense and sticky before I folded in the egg whites but aftewards it was ok. It all made sense after I was done.
Thanks again for the great recipes.
naomi
can I use this recipe in a bread machine?
amanda
This bread is amazing, my husband told me you are coming out with a book soon, I can’t wait to get it. I just recently went gluten free and I have visited this site so many times, and already made such great things. I didn’t read my label on my cashew butter clearly, I used cashew butter, not raw, but the bread still turned out great. Is there a reason you use raw? Is raw cashew butter better than just regular? Thanks for such great recipes, its been really hard going gluten free, and I have been dairy free for five months. Its a change of life, but a great one. Thanks to your great website.
Marybeth
This bread is so good! I have made many paleo bread recipes that were terrible and i swore this was the last one I was going to try and Im so glad I did! I have one question though, do you have to use that raw cashew butter? i used the same kind you mentioned but it was like $15.00 so it ends up being a $20 loaf of bread. Id like to be able to make this on a regular basis to always have some available. Do you have any suggestions?
Against All Grain
People have success with the roasted cashew butter it just may change the flavor. Each jar of the raw should make 2 loaves of bread. I calculated it out to be around $8.50/loaf using all organic ingredients. It is also cheaper if you buy raw cashews and make your own cashew butter, but you need a high speed blender to get it as creamy as the store bought.
Emily
Hey…thanks so much for the recipe! I tried this today and everything turned out fine but the bread has a strange smell. I’m new to the SCD diet and haven’t made any bread before so I’m not sure if this is what it’s supposed to smell like. Maybe I didn’t use raw cashew butter. Could that be it? I almost smells like I added too much baking soda when I didn’t. I miss bread soo much so I really want this to work out!!! LOL
Against All Grain
The apple cider vinegar could give it a little bit of a weird smell.
Rachel M
Mine also smells kind of weird, sort of like raw eggs. Just happy it tastes good.
Tina
THANK YOU for this recipe! I made it and this is my favorite grain-free bread recipe so far! It’s also cheaper than the recipe I was using that called for coconut butter, almond butter, and macadamia nuts. That was good but EXPENSIVE. I bought raw cashews and processed them into butter in the food processor which probably also helps cut cost. Looking forward to trying it tomorrow as a grilled cheese sandwich! I pinned this onto Pinterest so, hopefully, more people will find the recipe. Thanks, again!
Grace
I don’t like anything coconut. What can I use in place of the coconut flour?
Laura
Oh myyyyyy! I was so thrilled to find this recipe, after so many others turned out dubious at best. After baking my first loaf and cheating a bit during the cooling time (yes, that tiny broken off edge tasted so good with a little ghee on it!) I just polished off my first guilt-free sandwich since going paleo! Thank you SO MUCH for creating this amazing recipe! I am going to share it with my specialist next week (I have colitis) as he is excited to see me trying paleo 🙂
James
This is, by far, the best ‘paleo’ bread that I have ever tasted.
Emily
I just tried this with homemade cashew butter and homemade yogurt instead of the almond milk. It is delicious… just didn’t rise much at all. Possibly it was the yogurt and the fact that I didn’t have a glass pan – I’ll have to find one and try it again. It is definitely my favorite grain free bread so far – much less eggy than the recipes with all coconut flour. I’m excited to try it as french toast and grilled cheese!
Kathy
Hi, thank you for the recipe. Mine came out nothing like yours 🙁 it is brown all the way through and does not have a lovely crust like yours either. Not sure where I went wrong. I followed the recipe instructions to the T. As long as it taste good in my stuffing I will be happy though.
Jurgita
This is absolutely outstanding! I made it yesterday and had it sit overnight, and this morning sliced up some to toast. Mmmm…. It’s so soft, so fluffy, so moist!!! My 3 year old just chowed it down with almond butter and apple spread. It blows my mind how delicious it is, sooo much better than many gluten free breads in stores that are too tough and dry and don’t taste nearly as delicious. You’re an innovator! Cannot wait for your book!
Emily
This looks amazing, I’m currently on a really restricted diet and would love to make this… HOWEVER… I can’t eat eggs!!!
Do you think this would work without the egg? Any tips?
Against All Grain
No unfortunately this bread relies heavily on the eggs
Jeanne
I am allergic to eggs but really want to try this bread, which looks awesome. Since the whipped egg whites seem so integral to the structure of the bread,” flax-egg” replacement (1 TBSP ground flaxmeal in 2-3 TBSP water) is clearly not going to work. I’m wondering about fermenting the dough–like a sourdough bread. Has anyone tried going Sourdough?
James
This tastes way better than real bread! I will definitely make it again.
emily
My only question is, can you taste the coconut flour in it? My husband is tired of everything tasting like coconut. 🙂 Now I don’t mind it, but he sure does. It’s tough trying to go grain free (well, for my husband, I am doing just fine).
Against All Grain
I don’t think you taste it at all! I used to hate the flavor of coconut too. Most of my recipes try to hide it 🙂
Melodie
I just made this. It is awesome. Thanks for the recipe… I made it with almond butter instead of Cashew and it was good.
Ashley
Could u use a bread machine with this recipe
Tami
I made this recipe last night and substituted sun butter as I didn’t have any cashew butter and was having a hard time finding it. It turned out great (did taste of sunflower seeds, which was ok). I wrapped it up and found that overnight it had turned green in places. Texture and taste was the same but definitely unappetizing looking. What caused this? The egg whites oxidize or something?
Against All Grain
The chlorophyl in the sunflower seed reacts with the baking soda. You can find instructions on Google on how to counter it.
Nancy
Looks awesome! One question do u know how.money carbs r in it?
Kristen
I love this bread. Do you know if it freezes well??
Bij
I made this bread and it was perfect!!! I just tried it with Almond flour and it was also perfect. I’m gonna do it all coconut flour and milk next!!! Thank you so much!!!
Deb Whitson
THANK YOU!!!! This bread is delicious! I made my own cashew butter in my Vitamix. Well worth the work and the extra dishes. :o)
Rachel M
Delicious! This bread so far has been a huge success. I’m still waiting to see how it will stand up to sunbutter & jelly sandwiches, but fresh out of the oven it tastes divine. I used a dark loaf pan but didn’t have any issues with it burning. It still came out looking like whole wheat rather than white, but I don’t mind.
Andrea
My daughter is allergic to tree nuts (so no cashews, almonds, hazelnuts, pecans, walnuts). I have to be GF and I have been looking for a recipe for bread that will work for both of us. I read all of the comments and did not find anyone who did a substitution that was nut free – so my question is:
Can i use smooth peanut butter in place of the cashew butter?
That may increase the fat content, so decreasing the egg yolks may be in order I suppose.
We are dairy free as well – so no almond milk nor cow’s milk. I have organic soy milk on hand I may try that – or goat’s milk when I can get it.
I may just try it and hope for the best – I will post my results.
Andrea
ok, so I went ahead and tired it with peanut butter – it did come out pretty good. The loaf was about half the size of a ‘traditional’ loaf of wheat bread but wasn’t dense at all.
Let me repeat that – this is a gluten free bread that was NOT dense. It is a little moist so I will see how it fares after a night in the fridge.
HOWEVER – I did make it with PEANUT BUTTER (organic, smooth, roasted) in place of the cashew butter ….. it is browner, about the color of pumpkin bread, and has the distinct taste of peanut butter. I am sure it will be good as toast – but as a pairing to more savory dishes it will be a little strange.
I am very happy with the texture – and the flavor actually – but I will continue to experiment with this as my daughter isn’t as forgiving of the peanut taste as I am.
If anyone has suggestions – I would love to hear them …..
Against All Grain
Thanks for sharing the outcome!
Dee
I’m looking forward to making this bread over the weekend. Is the amount for the coconut flour correct at 1/4 cup? It seems to be not enough.
Against All Grain
Yes coconut flour goes a long way!
Dee
well alright… I’m going to make this tomorrow. Thanks for such a prompt reply
Anya
Could I sub the egg yolks for egg whites?
Against All Grain
No the whites make it rise
Anya
Whoops, I’m so sorry – what I meant was use all egg whites – substituting egg whites for the egg yolks (I’m trying to avoid egg yolks). Thanks so much for your reply!
Against All Grain
You may be able to. Please let us know how it turns out
Anya
I made this yesterday with all egg whites (no yolks) and it came out perfectly delicious! Very light and spongey – look forward to letting it rest a day or two to see the difference in texture. It was more on the whole grain side in terms of appearance as I used 3/4 cup bulk cashew butter (did not look raw) that I had in the pantry and 1/4 c homemade in the blender. Will definitely be making this again with all raw cashew butter – thanks so much for the recipe – agree with another writer – what a gem!
Against All Grain
Awesome! Did it rise as much as my photo? I tried it with all whites and it was really short
Anya
I just made it for a second time – I’ve been using a round 5 cup Pyrex container as I don’t have a glass loaf pan – it is about 2″ tall after it cools. Is that similar to yours?
Rachel
Yikes, what a mess I made. The mixture was so sticky I couldn’t mix it with the hand mixer, a spoon or my hands… even after adding more coconut milk it was just too sticky, the mixture was being flung all over the place. I mixed in the egg whites and wasn’t sure how much I should mix… it was still a little clumpy when I stuck it in the oven. Is it supposed to be? Or do you mix until all clumps are gone?
All in all, unless this comes out amazing I will never do that to myself again. haha X) I have to go clean up the batter I flung everywhere now.
I love your blog by the way; I just found it last night and have saved several recipes to try.
Rachel
Verdict is in! Mom loves it. It smells unappetizing (like raw cashews and…vinegar perhaps), but she said it doesn’t taste like it smells. She loves it toasted with raspberry preserves I made using your blueberry jam recipe. She said it’s reminiscent of sourdough. So I suppose I’ll be making a mess again in the future! I think I’ll add a bit more oil to my cashews next time, and I’ll mix in half of the egg whites to make the mixture less impossible to mix, before folding in the rest of the egg whites at the end to maintain some fluffiness.
I’m making your not-a-grain bars now. 🙂 In just 2 days I’ve made your tortillas, lasagna (using tortillas), preserves, bread and now not-a-grain bars. And so far everything has been fantastic. Yours will be the first cookbook I ever buy. Cheers!
Against All Grain
You can try adding the coconut flour in small amounts after the egg whites are folded in for easier mixing, but I’m not sure if it will rise the same. I’ll have to try it next time. So happy she likes it (and yes the smell is something you have to look past because it tastes so much better!)
Vanessa HIll
I don’t think it smells bad at all! It smells like bread to me.
claudia
Does the cashew butter have to be raw or can I use cashew butter made from roasted cashews?
claudia
Have you ever tried making this with cashew butter made from roasted cashews, or is it crucial to use raw cashew butter?
Against All Grain
Others have used roasted and they say it works fine. There’s extra oil in roasted so the loaf may be a little darker and more dense
Vanessa HIll
It worked fine for me! Want to try the raw cashews sometime but they didn’t have the raw butter at the store and didn’t want to make homemade, so I made it again with roasted. Delicious!
Liz
Best bread recipe I’ve found so far! I think I should’ve whipped the egg whites more to make them a bit stiffer because when I folded them in, I was afraid they were deflating so I tried to be really gentle but ended up with a marbled product that I think could’ve risen a bit more. Definitely would make this again, though!
Andrea in New Mexico
I made this tonight and aside from my needing to work out a few high-altitude tweaks (I’m at 7,000 feet), it’s pretty awesome.
My top center fell/caved in after it came out of the oven and I don’t know if it was simply a matter of my having mixed the eggs whites into the batter too enthusiastically, or if I need to bump the oven temp even a little more (I went with 320 instead of 300). (I was also using a metal pan.)
This bread, regardless of any changes I want to make, is a godsend. Thanks for all the work you did in figuring it all out!
Cat
Hi Andrea,
I’m at 6000 ft. and the first couple loaves I made fell in the middle. I cut the baking soda in half and add a bit more almond milk (not quite double) but I’m in Colorado where it is semi arid climate so we usually need more moisture. I also have taken other folks suggestions of mixing in a spoon full of egg whites first then adding the rest to make it easier to incorporate without deflating the egg whites. This bread is a staple in our house. Good luck!
martine
Hi,
What is the purpose of adding apple cider vinegar ?
I think the taste is strange
Thanks
Against All Grain
It reacts with the baking soda to help it rise. You could probably use baking powder and use 2x the amount listed for the baking soda and eliminate the vinegar.
Tricia
I made this last night after reading all of the wonderful reviews. We accidentally bought roasted cashew butter, and as others said, it was more brown/wheat color. Taste was just as good. Not sure if you bake in a convection oven (I do), so I wasn’t sure if it’d take the full amount of time. I got a clean toothpick at 40 minutes and pulled it out. A small bit of middle fell and wasn’t cooked all the way through at the center. So, next time–full time in the oven. Having said all of that… it was delicious, and will make again and again. It’s a softer texture, almost a cross between a cake and bread. We’ve enjoyed it toasted, but must be careful to toast at lower temp, in the oven, as it browns (especially edges) very quickly. I’ve set some aside to see how it changes over the next few days. I’ve only just discovered you, so happy to have found you! Thank you! Thank you… from someone new to no grain cooking!
Kathy Lowery
Hi, Thank you for this recipe. I made it with roasted cashew butter before Thanksgiving and it came out brown, did not catch that it should be raw. Today I am making it with raw almond butter. I can not find raw cashew butter where I live but Trader Joe’s has the raw almond butter. I will let you know how it comes out.
Stefanie
Hi there! I was recently diagnosed with an autoimmune disorder, and much like you am now on a quest to find great gluten free and paleo recipes. I absolutely love your blog!
I am wondering if you-(or any of your readers)-have ever tried making this recipe in a bread machine? Is it possible?
Thanks!
amber trees
i have made this bread a couple of times now and it is so good!!! we usual eat it so fast it barely has time to cool!
Jeraldyne
Aaaand definitely this one!
Good luck to me! =)
You are awesome. I love all your recipes ^.^
Elizabeth
Commenting for the coconut flour giveaway – I love this bread, I’ve made it a few times now, and it’s always turned out well 🙂
Kymber
When I feel like I’m missing bread…this is the go to recipe!
Cristi
This would be my favorite recipe for scd! My family eats a lot of bread, so a good substitute is a must!!!
Eleanor
This is my favorite of your coconut flour recipes!
Meg
I love this bread. It’s by far the best gluten free bread I’ve ever eaten. Doubled the recipe last time so that I could have some to share. It’s my favorite of the coconut flour recipes on this site and it’s so easy to make too.
Kelly
The bread is my fav recipe of yours! The lasagna with coconut flour tortillas is a close second.
Mamie Simmons
This recipe make my husband’s day, and is the perfect side for a hot bowl of soup. Would love to spend all of a gift card making loaves of this to last us for … probably 10 minutes.
Shane Jennings
I have not made any of your recipes with coconut flour as I just recently came across your site, which is amazing by the way. This is the next one on the list though.
Jennifer
I am just starting to go grains free, this recipe will help with the transition.
Roxanne Ramirez
I’m going to try this recipe and was wondering if store bought cashew butter could be used? I see a lot of people here make their own
Lisa
Delicious bread. Thanks for posting the recipe. Is there a possibility to know the nutritional breakdown of this bread? Thanks!
Tiffany
I can’t make this bread fast enough… Great recipe!! Thank you!!
Tiffany
Tricia
I posted after my first attempt making this wonderful bread, using roasted cashew butter, since that what my husband brought home =) Today, I’ve made it with raw, and the brand recommended. Wow! Roasted cashew butter yielded a great bread… but raw, even better! Wow. Just wow! Today, I’m trying a few other recipes from the top ten, too. What started out as a quest to find gluten free recipes for a friend meal train has turned into a love of our own! Many, many thanks.
Against All Grain
Thanks for the feedback Tricia! Glad you are happy with the recipe!
Tricia
Meant to say, too… I substituted regular salt for sea salt, and while I don’t know if this is why, the loaf had a nice rise, even split a little across the top. Beautiful and delicious!
Nikki
Wow, you are my HERO! I made this bread yesterday and the reason why it took me until this morning to comment about it is because I spent all afternoon yesterday driving all over town to pass out samples of it to my friends! They are so impressed, I am so impressed, this recipe is AWESOME! I multiplied the ingredients by 1.5 and increased the cooking time to one hour and it turned out fabulous! I couldn’t find Artisan’s cashew butter so I used the 11.5 oz jar of Kettle brand cashew butter (like I said I increased the recipe). You’re an angel. Thank you.
Roxanne
do you think agave nectar would work in place of honey?
Vanessa Hill
Hi Danielle,
I made this over the weekend with roasted cashew butter, which was a mistake, but it was still good. Next time I will will raw cashew butter and make a double batch so it will be a taller loaf. It is really good and I especially like it toasted; it toasts better than an almond flour bread I have made in the past. This one is a winner. Today I had toasted bread with peanut butter and today I will eat an actual sandwich, somethink I have not done in over a year and a half. Thank you thank you thank you! You are a goddess in the kitchen!
Sincerely,
Vanessa Hill
Gluten Free Chickadee
Jenna
I cannot thank you enough for this!! I am brand new to Paleo (only 1 week in) and my bread cravings have been incredibly intense. This bread is delicious and SO easy to make!! Next time I make it I may even get fancy and add some cinnamon to the batter for french toast!
Have you posted the recipe for your preserves? They look phenomenal!!
With SO MUCH GRATITUDE!!
Jenna
Gwyneth
Would this bread work using flaxseed egg replacer?
Against All Grain
Doubtful the eggs make it rise and hold it together. That being said, I’ve never tried it so if you have success please come back and let everyone know so they can try it too!
Shelley
My son has an allergy to egg yolk, so I replaced the 4 egg yolks with chia seed (3 tbsp chia seed soaked in 9 tbsp of water). I still used the 4 egg whites. I also replaced the coconut milk with 1/4 cup homemade yogurt. It rose well and tastes great!
Caitlin
I made this a couple days ago and OH MY GOSH!! So good! You are brilliant. Love your blog. Thanks for the recipe.
Megan
Hi
Love your recipes! This bread is amazing. My question is, do you think I could make this bread and then freeze it?
Thanks!
Susannah H
Made it tonight for the first time with dry roasted cashew butter (bought it at WF by accident because they didn’t have the kind you recommended except in single-serving packets) and it was a *very* short loaf but really yummy. Only other change we made was subbing whole milk for the almond milk. Even my highly skeptical husband agreed that it was very surprisingly good! Next time I will try folding in the whites instead of beating them in like I did this time to see if it rises more. Awesome recipe!
Sergio
Has anyone tried this in a bread maker?
Against All Grain
No, I don’t think it would work.
Rebecca
I made this and it turned out really well (actually, I didn’t make it — my son’s girlfriend made it as she is doing coooking for me in exchange for some of her rent, I gave her the recipe). It is really good but it turned out a darker shade of brown that I see in the photo. So far, I have eaten it warmed with butter and as a sandwhich with egg salad. It was slightly sweet and I wonder if the honey could be cut down. I will be making this regularily.
ubiniquis
Thank you soooo much for this recipe. I’ve been missing my bread in the mornings and this is the first recipe that actually works and as you say it gets better with the days…also the consistency is amazing. Thank you!
Noreen
On a 6 week challenge, made this per recipe with no honey and it is wonderful. thanks
Tracey
Thank you so much for this recipe! I am new to SCD and have hope again in a loaf of no grain bread! I also discovered cashew nut butter (so delicious!) I am on my second loaf, it is in the oven now. I also make the SCD legal homemade jam (blackberry), and we haveit on this toast in the morning, and it really satisfies the protein low I get in the mornings.
Kim Gonthier
I just discovered your site about a week ago and am in love with it already! The only problem I’m having is printing the recipes. I read a prior post where you said there was a print button in the upper right corner of the page, but I can’t find it. I see a Pinterest button under the main photo on the left, but that’s it. Is there an easy way to print the recipes? I don’t have a computer in my kitchen! Kim
Against All Grain
I’ve just added a new print feature, that shows up on the new recipes, and we’re working on getting it fixed on all of them as soon as possible.
Against All Grain
Thank you! I’ve just added a new print feature, that shows up on the new recipes, and we’re working on getting it fixed on all of them as soon as possible.
Monica
Made this bread for my low-carb hubby and he loved it. Came out very nice and moist, just like the pictures! Also tried it with almond butter, and it just looks like whole wheat! 🙂 Texture is still lovely. The almond butter we had seemed very smooth and liquidy compared to some I’ve tried, so I think that helped.
heather
I am only seeing this post now for the first time via pinterest, but i am super excited! Now i have so many possibilities because you have given me white bread!! I see french toast, egg in the holes, pb&j…..i cant wait. thank you so much.
I drink lactaid milk, because i just LOVE milk and it does not give me any problems. can i use that in place of almond milk?
Against All Grain
Yes, that should substitute just fine!
Emily
I have made this bread today. It’s currently cooling on the counter and looks delicious. I made a couple subs. I used almond butter and coconut milk since I don’t have cashew butter and almond milk. I’m wanting to make some french toast with it. It’s something I’ve been hungry for since I gave up wheat and most other grains! 🙂 I am pretty sure my husband won’t eat it. He hates almond flour and coconut flour. More for me! lol
Marci
I just made this tonight, and sliced it because I couldn’t wait to try it. SO GOOD! I can’t decide what to start with tomorrow morning: eggs & toast, toast & jelly, French toast, toast & leftover cashew butter, sandwich…wow. I’ve been eating paleo for about 9 months, and found out after my whole30 that eating gluten just wasn’t worth it. I looked at this recipe before and just wasn’t sure I wanted to tackle it. But I’ve been tempted to eat some bread recently, and thought it was time! 🙂 Thank you so much for the hard work you must have put in to perfect this recipe! Next time, I’ll have a new box of baking soda, and get the eggs a little firmer. But this was still a success!!
Shanonn
Hi! Love this site. I made the bread today and didn’t have enough cashew butter, so I subbed sunflower butter. It came out good, but the top is green!! Is that just the sunflower butter, do you think? I’ll eat it for sure, the kids might not unless I cover it with jelly or something. 🙂 Off to try your fruit roll ups now!
Against All Grain
Google sunbutter and baking soda reaction. 😉
Lisa
Wow! Although I made a couple modifications to this bread because cashew butter is a little too high in carbs for me right now as I’m trying to lose weight, this recipe is by far the BEST bread substitute I have tried (and I’ve tried a lot!) I subbed almond butter for cashew butter and put my batter in muffin tins with liners for portion control. They look a little more like muffins but taste a lot like a dense, whole grain bread. I cannot wait to try this recipe with cashew butter when I’m maintaining weight!! Thanks so much!!
Cory
Hi, I followed your directions exactly as it states here. My bread, although edible, came out nothing like your picture. I want to make this bread to use with sandwiches. Please, please, please respond. ;(
Against All Grain
What was wrong with the bread? What did it look like?
Against All Grain
Did you beat the egg whites separately? I’ve never had a problem with it rising. What size loaf pan did you use? Grain-free breads without yeast don’t rise as tall as your conventional breads.
Amy
I just made this for the first time. It was sooo yummy! Thank you!
Irina
Can anyone recommend using something other than cashew butter..? I am allergic to cashews, pistachios and almonds. Thank You…
Against All Grain
Try using sunbutter, that should work the same!
momofsix
Thanks for all the great recipes!
I can not get almond milk where I live. Is there something else I could use?
Against All Grain
Coconut milk would work just fine!
Annie
Hi, thank you so much for this recipe. I am scratching my head trying to figure out where I went wrong as the outside crusts were delicious and the inside was a soggy mess. I tried baking it an extra 20 minutes and still soggy mess. Any ideas? I followed each step exactly – would making the eggs into even more stiff peaks help? I’m just not sure where to begin.
Against All Grain
Hm. I’m not sure what went wrong, I’m sorry! Try again and see how it goes.
Shaina
Hi! Just wanted to share my experience. I used homemade raw cashew butter that was processed with a little flax oil to make it smoother. I also used unsweetened almond-coconut milk and subbed maple syrup for honey, because my honey always seems to super-heat and burn everything. The loaf turned out awesome! Per your suggestion, I put a dish of water on the lower rack and I had a perfectly golden crusted loaf and it was not dark on the inside at all. I also don’t have parchment paper and I used a non-stick metal pan greased with coconut oil and it didn’t burn, and I had minimal difficulty getting it out of the pan. The loaf is very moist and light, I didn’t expect that kind of texture at all. But it’s also delicious. I could see it being a very versatile gf muffin recipe, just add blueberries or something like that! I love the crust it makes. Thank you so much for the awesome recipe.
Deb painter
Thank you! I have tried other recipes as well & nothing like this. Really really appreciate it
tiffany
Are there any good substitutions for the cashew butter?
Against All Grain
Almond butter is a great substitution for cashew butter!
Kathy Lowery
I have used raw almond butter and it worked just fine, it was just a darker loaf.
Cindy
What can I use instead of the cashew butter? Only “nut” he can have is peanuts. As for the almond milk.. can we use our “safe” coconut milk (unflavored or vanilla?) Seems coconut milk is so thin compared to almond milk.
Against All Grain
You can use peanut butter or sunflowerseed butter, coconut milk is fine too!
Sandy
Just made a loaf of his and it’s really great – such a nice texture and only uses 4 eggs which is such a reduction to the other Gaps/paleo breads I’ve made in the past with almond flour. Thank you!!
Mary Watson
I am very new to all of this, tried purchased no gluten bread and it was ok. No real taste to it. I made this yesterday and WOW, loved it. I am trying to figure out the carb count for it so that I can adjust my insulin. Right now I am guessing what to dial it down to. If anyone has information about carb count please let me know.
Thanks
Mary
Nancy
I make this in a long thin loaf pan (12×4) so my slices are a little smaller – probably about 1/2 of a slice of reg bread. So i count two of my slices as one serving. Carbs per serving = 4.04g. .87g of dietary fiber.
Mer P
I just found your website (thankfully! My husband is getting very leery of the meat & veg only combo I offer as chef in my now paleo + dairy kitchen). I haven’t been able to find coconut flour anywhere in store (online I guess), I’ve subbed almond and tapioca/potato starch with some success. Does coconut flour produce a significant coconut flavor in the final product. One of the hardest things for me about paleo is that there are basically three flavors my hubs and I can’t stand: coconut, maple & bacon. i feel like that means I never get to have anything baked every again 🙁
amber
This bread does not taste like coconut at all to me. And I’ve made this bread about 20+ times!
Janna
Just made this bread, couldn’t wait till it cooled! I think I may have figured out why some of us get dark bread as opposed to white. The brand of cashew butter the Against all Grain uses is a truly “RAW” cashew butter. What we can make or get in bulk from places like Whole Foods has been heated this darkens the butter and the finished product. Do you slice it before refrigerating?
Janna
Great bread over all!!
Mia
Hi, I’m on the hunt for a gluten-free bread recipe, this sounds fantastic, but I’m wondering if I can make it with a bread machine? Also, my son is allergic to cashews so can I substitute another type of nut?
Against All Grain
No it won’t work in a bread maker, sorry! You can use almond butter and that would work fine.
Susannah
I’m making this now with a few tweaks due to what I had on hand: I replaced the cashew butter with 1/2 cup raw almond butter and 1/2 cup coconut butter. I also folded in the egg whites. can’t wait to try it – haven’ had bread in years!!!!!!!!!!!
Qehn
I am grain-free (mostly) but not legume-free. So I tried making it with peanut butter and garbanzo flour. It’s light brown instead of white, but otherwise it worked great. Thanks for the great recipes!
Betsy
Just made this! Turned out great except for a few things.
1. My cashew butter mixture was pretty thick so it never got batter like. When I mixed in the egg whites there were still clumps of the cashew butter but I was afraid to over mix so I stopped. Still tastes great, but there are dark spots throughout my bread.
2. I cooked it 5 mins longer, but am wondering if I should have gone another 5 mins. It’s done, as in not wet inside, but it’s pretty moist still. Yours looks dryer inside than mine.
Again, WONDERFUL recipe and will make it again. Just wondering if you have any tips for my issues above?
Thanks!!!!
Krys
You have ended my family’s misery! 😀
Last year, we began a gluten free lifestyle for a variety of health issues (mostly with my children, ages 2 and 4). Food joy ended as they knew it, since they LIVED for bread!
I’ve had such little luck making bread (or even buying it, for that matter) that they’d eat, that I didn’t have much hope for this one either. I even used Peanut Butter I had on hand, instead of Cashew butter, because I was so sure they’d hate it, and I didn’t feel like going to the store. 🙂
They LOVE it! My daughter just now finished two sandwiches made from this bread, and I couldn’t be happier!
Thanks for making lunchtime happy again for all of us!! 🙂
Bonnie
Do you have suggestions for a substitute for the coconut flour? We have a sensitivity to Coconut. Perhaps almond flour?
Thank you!
Against All Grain
Bummer! Coconut flour is important because it is also used as an absorbent, so if you took that out or subbed something else in for it the texture would be completely different. You can try it though, I don’t know exactly how it will turn out!
Kim MacRabie
Thank you, God bless you, Gracias, all that. You have helped me (a mom who has been Paleo a year) make the transition so much easier on my kids and husband. I recently decided that it is simply not right that I am the caretaker of this family and I eat better than those in my charge. My middle child has cancer, I’ve read too much to keep feeding him processed foods, grains, sugars, etc. If he has to switch to (possibly) save his life, the rest of the family has to do it too. The first few weeks were tough, this recipe has opened up a whole new realm for us. EVERYONE loves it, even me, and I don’t need it, I haven’t missed bread at all, but now I’m hooked on this. Other than that, I am grateful beyond words to you!!!
Against All Grain
Wow thank you for sharing your story Kim. I am so happy that I can be even a small part in making your child’s life happier with recipes! This is why I do what I do and comments like yours keep me at it. I’d love to share this on my Facebook wall – without your name of course. 🙂 Thanks for making my day!
TanyaS
Hi this recipe looks delicious and I have been searching for a gluten/dairy/yeast/egg free bread recipe. The only problem is the eggs, please could you advise what to use substitute the eggs with? Thank-you:)
Kamelia Szarowicz
Can I use other oil with this recipe (to save money) like coconut oil, olive oil or butter? I have to avoid grain, but not so much the other stuff. I am trying to purchase everything on a strict budget. So I was hoping to avoid the Cashew or almond butter for now. So far I have purchased almond and coconut flour, celtic sea salt and the spirl slicer. Have to take a rest from the spending for now:) But really want to try this bread.
shannon manasvigangkul
I made this for the first time last week. My family loved it! I was wondering if it is possible to cook more than one loaf in the oven at one time. (The last loaf was gone before supper.)
Randie
this was absolutely delicious. I made my own cashew butter with a bit of coconut oil and it worked perfectly. Amazon sells a 5 lb lot of cashews for $35 that is on its way to me now. Need more bread!
kateryna
OMG, I just made this bread and I can’t believe how good it is. I was really skeptical after trying many recipes on other sites but this one exceeded my expectations: it’s porous, light, moist and delicious – all the qualities I missed in bread. Thank you so much!!! You are amazing! 🙂
Christine
Thank you! Thank you! For so many of your recipes. Our treasured little 5 year old boy who enjoyed good health until last fall when he developed a seizure disorder that 3 different pediatric neurologists have said cannot be controlled with diet (while his body shows amazing signs of healing & seizure management through diet so far) is finally able to have a delicious version of Stuffed French Toast every Sunday like he used to enjoy at our favorite breakfast restaurant. Your pancakes, waffles, real deal choc chip cookies & many other breakfast recipes especially have added back a certain quality to our daily life that restrictive diets can jeopardize. I have shared your blog with the nutritionist we are working with and other functional medicine believers. You are a.m.a.z.i.n.g!!! We cannot wait for our pre-ordered copy of your cookbook. Thank you for what you do!
Against All Grain
I loved this. Thank you so much for sharing and bringing so much joy to my day!
Debi UHl
Loved this bread – even though I made it wrong! I did not separate the eggs – I was too busy talking to someone to remember to look at the recipe and I used almond butter instead of cashew butter. But it tastes fantastic… just a few weeks into removing most grains and refined sugar and feeling great. Love your site.. also made the pancakes and they were delish!
Jennifer
Hi Danielle,
I have made this bread many times and WE LOVE IT! So thank you! I’m just wondering – have you ever tried freezing it? I’d like to make several loaves at a time but I don’t want to go to the trouble and have it ruined in the freezer. Please let me know!
Against All Grain
Thank you so much! Freezing it does work, however I do think it’s always better fresh. But my friend always makes a few batches at a time and then just takes it out of the freezer and toasts it when she’s ready for it, and that also works! Hope you enjoy 🙂
Rupal
I made this bread today but for some reason it tasted like too much baking soda and I could smell the baking soda. Can you tell me why?
Against All Grain
I am sorry I have never heard that happening to anyone before. Perhaps you measured it incorrectly?
Monique
My daughter has a nut allergy to all kinds of nuts. Is there any other type of butter than can be used as a substitute to make this bread? I do have some “no nut butter” from The Sneaky Chef I was thinking of using. It is made from green peas I think. However, I just am wondering what other butter type substitutes I could make it with.
Against All Grain
People have used sunflower butter, but you would have to reduce the baking soda by half and increase the apv a tiny bit so it doesn’t turn green.
Jen
we have nut AND sunflower allergies , so is there any other “butter” we could try that you think would work ?
Kymberley
I just made a loaf using tahini because nuts are no good for me, and it’s fantastic!
debbie
I made this bread tonight only with homemade almond butter. Its delicious , thank you for this recipe.
Jan
Can reg butter be used instead pf cashew butter? And can reg milk
be used instead of almond milk?
Against All Grain
Any nut or seed butter will work, but dairy butter butter will not work. But regular dairy milk is fine!
Kamelia Szarowicz
Only a 1/4 cup coconut flour? That doesn’t seem like it would make alot. What size loaf pan did use? How big of loaf do you get?
Against All Grain
Yup 🙂 It makes 1 8.5×4.5 loaf!
Kamelia Szarowicz
Thank you.
Beth
Mine turned out delicious! My notes:
1. No coconut flavor, beautifully browned on top, light inside.
2. Used homemade cashew butter made with raw cashews.
3. Baked in a glass pan for the longer time.
4. Once fully cooled (about 1 1/2 hours) my first slice was spongy and damp, but completely delicious!
5. My cooled loaf was 2 inches high.
6. Someone wonderful put the nutritional breakdown for one slice (not sure how many slices in one loaf?) on fitday.com.
I thoroughly enjoyed this – a keeper recipe! Thank you for all of your meticulous work in developing it, Danielle!
Marina Terzich
This recipe is fantastic! I made a couple of substitutions and it turned out great! Instead of coconut flour, I used almond flour, for the nut butter I put in 3/4 cup almond nut butter and 1/4 cup tahini. I used SCD legal mineral water instead of almond milk and its fluffy :). I think this is a good way to make all types of breads. Thank you soooo much!
Sheree
Do you think this would make good rolls or hamburger buns? I have the English muffin rings that we use for gluten free hamburger buns so the fact that its a batter won’t be an issue.
Against All Grain
I don’t know, I’ve never tried it. Feel free to try it and let me know how it works 🙂 I also have a dinner roll recipe though that I use for hamburger buns. Feel free to check it out if you want!
https://againstallgrain.com/2012/02/23/grain-free-crusty-rolls/
Mary
I just made this bread and all I can say is WOW! It’s amazing! Mine did not rise as high as yours (roughly half the size), and it is brown rather than white, but it is still tasty. Some things I’d change next time would be to beat the egg whites until they are stiff (I beat them until soft peaks were forming) and be more careful in folding in the whites. I’d probably do what another commenter said and beat in half the egg whites then fold in the rest. I do have a metal pan, though, so I probably will never get a fluffy loaf in that. My bread is perfect for bread and butter/peanut butter/jam but not really good for sandwiches, unless I had 2 or 3 sandwiches. I love the texture, too! I am newly gluten/wheat-free and this is a great alternative to wheat bread that doesn’t taste terrible/have terrible ingredients like the commercial gluten-free breads. Thanks for sharing!
Sam Stanton
I’m not strict paleo. Can I use regular grassfed butter in place of cashew butter or will only a nut butter work? I’d like to make this today as a treat for my boyfriend who I’ve gotten off grains.
Against All Grain
Only nut butter will work, sorry!
Kennysaur
This NEEEEEDS to be sold in stores. I NEED this. @o@
PEG ROSEN
Hi. I started to make this bread and realized that the cashew butter I bought was from organic roasted cashews. Checked ingredients on product web site and it doesn’t seem that starch was added during roasted process, so I’m assuming that means it’s SCD legal. The batter wasn’t really a batter….more of a dough, I’m guessing because this nut butter is thicker than raw cashew butter. I went ahead and threw it in the oven anyway but…..will it work? What’s the difference between raw and roasted cashew butter other than taste when you’re baking with it?
Against All Grain
The roasted butter shouldn’t make much of a difference in the texture unless it has a lot of extra oil in it from roasting. It’s more a taste thing because the raw doesn’t have anything added and raw cashews have more of a mild flavor.
Jen
thankyou for sharing , but what could I use to replace the nut butter as we have nut and sunflower seed allergies in our family , Any suggestions ?
Jen
p.s can a non nut milk be used in place of almond milk also ?
Jen
would really appreciate some input / ideas / suggestions for replacing the nut products in this bread mix please
Against All Grain
You can try tahini or sunflower butter.
Kelly Leonard
Can this be made in a bread machine?
Shelbie
I currently have a big ol’ jar of maple almond butter. Would that work ok instead of the cashew butter??
Dayris
Hi Danielle! I’m a huge fan of yours! Waiting to meet you here in Toronto – Canada! Looking forward to get your book! I am about to make this bread but just found out I ran out of parchment paper!!! What can I do? Thanks!!!
Natalie Wester
How many slices would this loaf yield?
Janny
Could you double the recipe easily? Love your site and can’t wait to get your book!!
Against All Grain
Yes I do it often! Just be careful when measuring the coconut flour!
vssheaffer
Thanks for mentioning us coconut phobes! I simply detest coconut and always have, and it seems every single Paleo recipe calls for something coconut! I wish more cooks would give other options or mention like you have, it there’s a coconut taste. Good to know I’m not the only one out there who hates coconut!!
Kamelia Szarowicz
Does that kind and size of your bread pan matter?
You said in a post that this recipe can be doubled, but to be careful with the coconut flour. What did you mean?
Thanks,
Kamelia
Against All Grain
I just likes the way it bakes best in glass. But any pan will do, as long as it’s the same size. For the coconut flour I just meant make sure you measure carefully when doubling it 🙂
Catherine
This is great, and I even made it incorrectly! Danielle, I wondered if you have a copy of this book: https://www.amazon.com/On-Food-Cooking-Science-Kitchen/dp/0684800012/ref=sr_1_1?ie=UTF8&qid=1375460029&sr=8-1&keywords=on+food+and+cooking
With all of your creativity, this may offer some helpful suggestions on new ways to engineer Paleo baking! (He might even collaborate with you!)) I’m looking forward to your cookbook.
carole
Good bread- but definately not paleo! Cashews and honey and almond milk are definately not paleo foods. You shouldn’t “advertise” that it is.
Tracey
Why? didn’t the cavemen eat honey, almonds and cashews? I’m SCD so it doesn’t matter to me anyways, this bread has been a blessing to me and my family and is the most natural bread I’ve ever made or eaten! Thank God for this chef, she’s a genius!! Cheers!
Kayla
From my understanding, all of those things are paleo, but it really depends on how strict you are with it. Considering nobody (hopefully) will be eating the entire loaf at once, it seems that all of the items are in enough moderation that it should be fine for a paleo diet.
Nancy Arendt
Just made a loaf of this bread. Had a hard time waiting a while to taste it. It tastes great but it is definitely not a white bread. I’m curious why putting a dish of water on the bottom rack is supposed to make it a white bread. I’m at 6500 feet and was anxious to discover if it turned out like yours at my altitude. It did not rise very high but the density and texture is good. What is typical for you in terms of size?
Amanda Oliver
THIS IS AMAZING!!! … I’ve been searching for a grain free bread recipe that tastes good, and have had very little success… this is BY FAR the best tasting grain bread I have EVER had! My mission is to now find a cheaper way to buy the cashew butter… thank YOU!
AMY
Can this bread be frozen after it is baked? I am thinking that I would like to make 4 or 5 loaves at a time and freeze them …then have them ready to use for my kids school lunches etc. thanks!
Against All Grain
Yes my friend does that all the time and it works great! She just toasts the pieces in the oven a little before so they don’t get soggy.
Bev
I just tried this recipe yesterday from your cookbook and am in love. I have made a lot of things in your book and we love everyone of them. I am so glad I purchased your book. I try to move it to the bookshelf when I am done cooking which makes no sense because I just go back and get it each time I have to make dinner. Thank you so much for being so great. PS I have never baked bread before nor have I ever baked and this bread turned out great.
Tisha
I just made this bread and it tastes delicious! The only problem is that it only rises 1.25 inches. I followed the recipe exactly. What do you think went wrong or is this just as high as it rises?
Against All Grain
Did you beat the egg white separately? What pan size did you use?
Autism Mommy
Ummm…there are no words. This bread is so good it’s barely believable. I used honey on the high end, assuming we’d have to “use it up” with french toast. Totally unnecessary. It didn’t last long enough.
When we went from GF/CF to totally grain free, I dreaded the switch for my little guy, who has Autism and already faces so many challenges and restrictions…no chips? No fries? No cookies? Poor kid. How would he last?! Just between your chocolate chip cookies and this bread, you are my hero. You make me look like a great cook and have brought simple pleasures and treats back to our house!
Thank you, thank you, thank you! Keep doing what you do — for those of us who are not-so-great in the kitchen, your detailed and charming writing style makes tackling a new recipe easier. I wish you endless success and happiness, you deserve it!
Bee
Just made it and it is fabulous! I made it with macademia/almond butter and it actually turned out really nice and fluffy (not white though but I don’t mind) I was just wondering how many slices per loaf? What is a single serving?
Donna
I made this loaf with sunflower seed butter and it turned out dark green. What a surprise. But it was absolutely delicious…even better the second day like you said. Thanks so much for sharing. 🙂
Melanie Peters
I cannot get enough of this deliciously sweet bread!!! It is so much better than any store bought (grain freeor not) that I have ever had! I add two tiny packets of stevia just to sweeten it a bit more but it’s just a personal preference. I am making it daily now as even my 2 and 5 year old cant get enough!!! Yummy!!
Dee
Just made my first loaf of this bread and was so surprised it actually works! Don’t know why I was surprised becuase the other recipes I’ve tried have been great. But I couldn’t wait to cut the first slice – and now I read that it gets better the next day. Can’t wait.
Michelle
After reading the recipe, I began scrolling down so I could leave a comment asking whether the bread tastes like coconut because of the coconut flour, and then saw the very last line of the post. Hahaha! Thanks for thinking of us coconut-phobes!
I’ve been eating no-grain, low-carb for a week, and while I am starting to feel better (I don’t know about losing weight yet), I already miss bread terribly. I was so happy to find your blog and this recipe. Thank you!
Sarah
I am eating this bread, toasted,with marmalade for breakfast right now. Delicious! My loaf rose but fell a little after cooling, maybe I need to whip the whites more or bake it longer? This bread satisfies my “mouth feel” needs-now I can have my sandwiches and toast! Your book is on the way and I can’t wait to own it!
Peggy
Just tried this for the first time. I have to eat GF and this is the easiest bread to make. Also, I am about to win some brownie points. My boss is on the paleo diet and she has been asking me for ideas about breads. I plan to take her a few slices of this!
Audrey
Hey, this looks awesome! I don’t have cashew butter on hand but want to try this tomorrow. Do you think I could sub the cashew butter with
a) coconut butter (Artisana) OR
b) high fat thick yoghurt
… or a combination of both?
Do you think the yoghurt would not make it rise or change the baking time?
adrienne
I made this and it didn’t rise, like at all! I used peanut butter though since that was the only nut butter I had enough of. Would it change it that much?
Chantal
Sweet Jesus! This has to be the BEST bread ive eaten since, well, since sliced bread really! Truly grateful for this bang on recipe. YUM
Julianaloh @bilbaobab
This looks and sounds amazing and I can’t wait to try it out! I’ve missed bread since my gluten sensitivities were identified. Also found organic cashew and almond butter in the stores and looking forward to try out the recipe!!
Wendy
Do you recommend using unsweetened or sweetened almond milk?
Against All Grain
Always unsweetened, and homemade is preferable to avoid additives!
Melinda
I just made this for the first time recently. While I love the bread, everyone else in my family thinks it smells “fishy” and won’t eat it. I agree the smell is different. Why does it smell like this?
Against All Grain
It’s probably the combination of the raw cashews and the apple cider vinegar. We don’t even notice it because we love eating the bread so much. You could try usign almond butter!
Olivia
I just got the cookbook and tried this bread. I was a bit skeptical as it was coming together- I am not a good cook- but it is AWESOME! Thank you so much for this! I have so many more recipes to try.
Lindsey
Hey there. I made this bread today. Followed the directions I believe to the letter. Looked great and then I cut into it and it came out green. Like green all the way through. I have no idea why. It tastes fine but do you have any idea what ingredient could have turned it green? I have pics if you’re interested.
Thanks for your input. The book is great and I’ve made the pot roast twice:)
Against All Grain
Did you switch the cashew butter for sunbutter?
natalie
hey i’ve made it a couple of times before (kept me on the primal straight and narrow so many times now haha)
just wondering if i could add cream of tartar or something to the egg whites to really make it rise, or is that what the cider vinegar is for?
Against All Grain
The apple cider helps the rise but cream of tartar may help!
Debbie
Hi,
I am very excited to try your bread recipe this weekend. I did purchase the cook book just prior to vacation and cannot wait to dig in. I LOVE to cook. A lot of these ingredients are new to me so you collection of recipes and detailed instructions are most appreciated.
My question, I do remember reading, but cannot now find the recommended “brand” of flour to use for the bread. I recall the Red Mill was not the best suited, left it soggy or something, I cannot remember.
Sorry to be a burden, but I would appreciate your sending the brand name of the flour. I have everything else and am anxious to get started.
I do look forward to hearing from you.
thanks.
deb
Against All Grain
The almond flour I use is in this FAQ page! https://againstallgrain.com/f-a-q/
Genevieve
SUCCESS! This is an amazing recipe thank you so much! I just toasted a slice and had it with some butter and jam – delicious! I’m so happy that I can have bread again 🙂
P.S. I love your book!
Debi Uhl
I have made this bread and love the flavor – and I have followed your recipe except I used regular milk instead of almond milk, and the bread is brown throughout. Is this significant enough o change the color. It still tastes amazing and I think nutty.
Debi
Laurie
Thank you SO MUCH for this recipe!! Here I thought I would never be able to eat bread again…you are a genius!! Last night I made pumpkin soup (or as I call it, pumkin pie in a bowl…)and this bread with the pumpkin spice blend…oh.my.God. I love how it’s so moist and fluffy.
Thanks again and I’m looking forward to trying more of your recipes. Your book also is really beautiful!
All the best to ya’!
Laurie
Sabrina
Just FYI, this works great on the bread machine. Just had to switch the order of ingredients according to manufacturers instructions.
Terri
I’m just starting my journey with a grain free diet in an attempt to control my Crohns symptoms without steroids. This bread is exactly the kind of treat that could keep me on track and from cheating in a moment of weakness!
Have you tried to freeze this bread at all? I would love to be able to have this on hand all the time, but I’m afraid I won’t be able to eat the whole loaf before it would get stale. Any thoughts?
Thank you! I’m really excited to try every recipe on your site, and I’m ordering my copy of your book this afternoon!
Against All Grain
Yes. I have friends who make a couple loaves at a time and freeze them until they’re ready to use them. Just cut a slice and heat it in the oven on low to defrost (or a little higher if you want to toast it).
Sabrina
Your recipe works great on the bread machine too
Sandra Brigham
Shut up! Are you serious?
Amelia
I am currently participating in the Lurong Paleo Challenge through my cross fit gym and your cookbook has been a lifesaver. I baked a loaf of the grain-free sandwich bread and it was oh so delish. Your cookbook will be my paleo go to for great tasting food. I may even continue this lifestyle after the challenge is over. Thank you so much!!!
Against All Grain
Thank you! Good luck on the rest of your challenge!
Megan
This bread turned out fantastic for me!! I used homemade cashew butter (adding a touch of water to the food processor helped to make it smooth and creamy). I also folded in the fluffy egg whites and it gave this bread a light texture and the perfect crust. I only had the standard dark nonstick banana bread type pan, so I stuck it on the second to bottom rack and did not add water underneath. I baked for 43 min, and it turned out perfect. The slices are too small to make into sandwiches, but that didn’t stop us from making cinnamon sugar toast! Thank you so much for this recipe! Once I get a glass dish like you used that makes good size sandwich bread, I know I will be making this all the time! Thanks so much for this recipe!
LaChelle
The family and I have been s.l.o.w.l.y…. transitioning to Paleo over the last few months. I think the hardest part has been the loss of bread. So after some reviews via other Paleo websites I frequent, I decided to buy the Against All Grain cookbook. One of the first things I tried was your sandwich bread recipe. After several, pricy failures in trying to get my hubby and kids to eat “grain-free” bread, I figured it was worth a shot since your recipe lacked almond flour (YAY!! since that has become a “bad word” in my house, lol) I made the first batch with store-bought cashew butter and it was amazing, albeit expensive. So, after that 1st loaf disappeared in less than three days, I decided to make homemade cashew butter and increase the recipe by 1/2 to get a more traditional-sized bread loaf. Holy cow!! Awesomness!! The color is beautiful, the smell is amazing and it rose up to just over the pan so it has the size of a traditional loaf of bread. I’m so thrilled that I almost cried when I took it out of the oven! Thank you, than you, THANK YOU!!! This recipe shall be a staple in my house!!!
Jenna
Has anyone tried freezing the loaf whole or sliced individually? I just made a double batch! Thanks!
Shantana
Our family reacts negatively to baking soda (I know, I know – I’m so sorry for the crazy questions you must get with all of our individual quirks!). If I have to omit the baking soda, should I add an extra egg white?
Against All Grain
Sorry I’m not familiar with baking without baking soda. The baking soda does a lot for the rise and air bubbles so I’m not sure how it would turn out without it.
Erin
Does the bread freeze well? And do I need to use the vinegar?
Against All Grain
Yeah it freezes fine! Just make sure it’s completely cooled to room temperature and wrap it nicely in an air tight container/bag before freezing it. Yes, vinegar it necessary because it reacts with the baking soda.
Sandie
OMG!!!! Just made this bread this morning. I followed your recipe exactly and it is awesome!!!!
My hubby loves it just as much as I do. Thank you so much for all you do!!!
Sandra Brigham
Just made this and it’s amazing. Chef husband says it’s the first Paleo bread recipe I’ve made him that actually tastes like bread! Great job Danielle!
Stephanie
Hi! I have a question – I see you use cashew butter in this recipe and almond butter in other recipes instead of cashew or almond flour. Can you use these interchangeably? What is the difference between baking with the butter rather than the flour? Thank you!
Christina Proulx
Just made this and it turned out awesome! I have some storage questions…can you freeze it? This will go quick in my house so it would be easier to make a bunch and freeze it. Also, should it be stored at room temp or in the fridge?
Veronica Cross
Hi
What can I use instead of cashews butter? My daughter is allergic to cashews.
Kimberly
I just made this bread today and I can’t believe how good it is! It really does have a bread like consistency. Thank you so much. Oh, BTW I bought your book today too 🙂 Can’t wait till it arrives,
rishy scott
I tried this recipe last night after I decided to get serious about cutting back on the carbs. I was shocked at the price of the teenie Julie Paleo bread at WF and decided to make my own. I could not keep my hands off this bread. It’s so moist, great texture, tastes wonderful…just YUMMY! Now I can officially ditch my Ezekiel sprouted muffins. Thank you for sharing.
Jenna
This looks so amazing. I’ve missed bread so much. Is there any way to make this without eggs. I have an egg allergy along with almost all grains. I’ll take anything even if it’s not quite as good. I would just love to have a sandwich again. Thanks you!
Ninufar
I haven’t tried an eggless version of this bread yet, but I’ll say that generally applesauce or banana or butternut squash puree works better for me than Ener-G egg replacer. (BTW pls forgive me for not having any clue about the paleo side of any of those.) If any of those are legit for you, I’d recommend using smaller pans (e.g. mini loaf pans or muffin tins) and baking a bit longer (while keeping an eye out for scorching).
I’ve made eggless versions of several of the Elana’s Pantry almond-flour breads that way. Upside: you still get a sweet taste from the puree while still ditching her recommended honey or syrup (which I can’t tolerate). Downside: very smooshed-looking “bread”… but yes, with careful slicing you can make a sandwich! I pretend it’s a bagel instead of a large loaf… slice horizontally.
Chia gel might be great here, but I can’t take too much chia or flax w/o unhappy consequences. Be interested to hear how this works out for you!
Patti
Made this bread yesterday and ohhhh so good! I followed your instructions to the T except I used a smaller loaf pan. Came out perfect! My girlfriend had purchased “paleo bread” which I tried and yours is much better! Been eating paleo for about 2 months now and getting used to the texture and consistancy of these flours. I LOVE your cookbook and have made several things so far. Yummy snickerdoodle cupcakes! 🙂 I love your cookie recipes on your blog as was a little sad they were not in your cookbook….I like having all my things in one place. Thank you for so many wonderful recipes! 🙂
Ashley
What can you substitute for the cashew butter for nut allergy?
Against All Grain
Sunbutter is a substitute for nut butters.
Courtney
What about the nut flours?
Joselyne
I totally failed! My oven wasn’t completely shut and I didn’t realize until the 50 minutes were up. I took the loaf out and was using a knife around the edges when I noticed one side was leaking dough. 🙁 I saved quite a bit of my loaf, but can’t believe I did that. The only other change was I used one sided parchment and one sided foil paper. Do you think that had something to do with it as well?
Against All Grain
Oh no! I hate it when that happens. Maybe a little bit, but I’d say the oven is the mail culprit here.
kuriousme
Thank, Danielle. We just made this recipe and posted the pictures on our website. https://kuriousme.com/grain-free-sandwich-bread/ Love, love, love – it turned out so well. We couldn’t believe that such healthy ingredients can make such delicious bread.
Jennifer
I finally made this last week for my family. Oh. My. Word! It’s amazing. Even my non gluten-free son LOVED it. And he pretty much hates most grain-free recipes I’ve tried. I love this recipe and will make it often. Your cookbook continues to be such a blessing to my family. Thank you!
Judy
I made this bread per the instructions, paying particular attention to some of the comments in order to assure success, I had great success. I place the bowl of water on the bottom shelf of the oven, used a glass pan, and beat in about 1/3-1/2 of the beaten egg whites and then folded in the rest. Since it was such a success I attempted making buns with the recipe, again I had success. I again placed the bowl of water in the oven, greased 8 English muffin rings with coconut oil, placed them on a parchment paper lined cookie sheet, divided the batter between the egg rings and baked for 28 minutes. They turned out beautiful.
Lillian
Mine rose but then deflated…. should I have cooked it longer? It was cooked through (toothpick came out clean) I had to bake it for longer than specified. Anyway still tastes great and we’re enjoying it thoroughly but it’s also still quite moist after being in the fridge a few days. I’ll have to try it again.
Denise Cook
I have made this recipe a couple times now ( and make 2 batches at a time) and my family, even those who eat grain etc loved it. I ran out of cashew butter ( I had made some myself) and so I used half almond butter and I loved it as well!! I just have to remember, not to use much honey if its for sandwiches. Also, if using a smaller pan, how much longer would i have to cook it? I would like to make several smaller loaves to give out to my going to go grain free friends to try. Thanks
melissa
is there any way to sub gluten free oat flour for the coconut flour? we’re stuck indoors and that’s all i’ve got for days…
Against All Grain
I have not tried that, so I am not sure how it would turn out, but coconut flour is much more absorbent than other flours.
Linda
Do I leave the “bowl” of water in the oven as the bread cooks?
Felicia Aron
Do you know the carb count per serving for those counting carbs?
Against All Grain
I hope to eventually include a supplemental nutrition guide on my site but it is very time consuming and I don’t have the resources right now. The best thing to do is plug in the ingredients into a nutrition calculator either online or through a phone app.
Juliet
Can I use a bread maker instead of baking it?
Janet
Wow. Okay, I’ve made this twice. First time, I didn’t have any cashew butter. So, I used coconut butter. It was good. Really good. But, the 2nd time, I made it with the cashew butter. The cashew butter is just the right texture and milder in flavor. I think it really made a big difference. Oh -and both times I used coconut milk as I dislike Almond milk and never have it on hand. Fantastic recipe!! AMAZING bread with the cashew butter. Not sure if the almond milk would have made much difference. But, I love it with the coconut milk. Not only is this recipe delicious, it’s also pretty easy if you ask me. …I don’t know why, but, I like whipping those egg whites. LOL! I’m weird like that, I guess. 😉 Thanks for this one. I am LOVING your book. …I bought it after I made your left-over roasted chicken soup (the one where you roast the vegetables and puree 1/2 of them??… Best soup ever.)
Jan McGivern Lewis
What kind of coconut milk did you use? I never have almond since I dislike it, too.
Dany
I have been looking for this type of bread but most of the paleo bread recipies said they don’t recomended eating it everyday. However the ingredients on thisone are different the the ones I have read. My question is: Is it safe to eat this bread everyday for my kikds?? I really want to switch to something healthy for my family instead of wholewheat bread but it seems like the paleo eating don’ advice eating bread everyday!! Thank you!!!
Ellen
I love this recipe! It’s the best paleo bread I have tried. I made my own cashew butter (1st time – so easy and yum!) and used real milk and duck eggs from my friend. Duck eggs are excellent for baking if you can get them.
I used a metal non-stick pan and it was fine.
Wonderful recipe we will definitely make it again!
Against All Grain
Thank you Ellen! So glad you are enjoying my recipe!
Dea
I just made this for the first time and I haven’t tried it yet… it is still cooling, but it didn’t rise and doesn’t look as tall and fluffy as yours 🙁 I beat my egg whites into soft peaks, but by the time I added them to yolk & cashew mixture, they became watery on the bottom. Could this be why it didn’t rise? I used the pan of water underneath as well.
Aysha AL Bastaki
Thank you for this recipe I tried it today and it was amazing…at last I found some legal bread to eat as I dont think I can tolerate wheat with my ulcerative colitis. ..definitely im gonna order your book
Aysha AL Bastaki
Thanks alot for this recipe I did it today and it turned out to be perfect. Now I can have wheat free bread and not worry bout my colitis. Definitely getting your book…thanks again
Schnaked1
I read a couple comments about not being able to substitute almond flour for the coconut flour, and I disagree. I made the recipe 2 ways: exactly as above and also substituting almond flour for the coconut flour. (In both cases I used half the amount of honey) In my opinion, the almond version worked better. A little fluffier, toasted better, and tastes better to me. I’ll be making it only with almond flour from now on. Either way, a great bread. Thank you.
Kathryn
Danielle,
I have made the bread exactly the way the recipe says twice now, and it comes out of the oven beautifully, but falls soon after. What am I doing wrong? By the way I love all the other recipes I have tried in your cook book and am making the hamburger buns for the first time tonight. 🙂
Tammie
This used to happen to me until I bought a thermometer for my oven to be sure the oven was actually the right temp and when the timer goes off use a instant-read thermometer inserted in the bread to be sure it’s 205 degrees.
SillyMcDrippins
I have had similar issues and tried a smaller loaf pan. That solved my flatsy bread issues. It will rise very high in a smaller loaf pan but after cooling off, it deflates to a nice conventional bread loaf shape. No more narrow looking sandwiches! lol
Letsgoplaces
Hi I also just made this bread to the letter last night. It looked perfect when coming out of the oven the 5 minutes later fell in the middle. I really hope a reason as to why this happens to so many people would be addressed. my oven is only 3 years old and never has problems and I live in the midwest. What am I doing wrong? I’ll still eat the bread of course but I really want to know what the issues might be as to why it falls.
Megan
Has anyone tried using this recipe with tahini? I have to order my cashew butter, and am looking for an alternative until it arrives 🙂
Kymberley
I made a loaf with tahini on the weekend, and it’d great! I haven’t tried it with cashew butter so I can’t make a comparison, but I was very happy with the result using tahini – it’s delicious!
sarah
I made this bread using a dutch oven. Preheated the dutch over for 40 minutes at 425. Coconut oiled a round piece of parchment paper and put the dough on it. Set this into the preheated dutch oven. Covered for 15 minutes at 425. Uncovered for 15 minutes at 425. I might have browned it too much. But it came out perfectly! I was waiting all morning for paleo toast with almond cheese on top. OH man,..it was worth it !
Cyndi
Could I make this in my bread machine? I don’t have a loaf pan and would love to take this on our trip this weekend.
Against All Grain
I have not tried it, but I have heard that some have had success doing it.
Cyndi
Thank you, I’ll try tonight.
Jasmine Atiyeh
Hi Cyndi,
Did you make it on bread machine?
Genea Crivello-Knable
Wow! This is by far the BEST gf bread I have EVER eaten! I guess there is still debate over the cashews being beans thing with paleo that and the honey thing. I am not that strict so I definitely do both. This bread was just fantastic! It was nice and moist considering most coconut recipes end up pretty dry. The bread has a nice moist spongy texture to it(in a good way). The outside of the bread had a thin lovely crust as well. I love how the bread even tastes buttered plain. I used your suggestion of adding coconut oil to my raw cashew butter(I bought the cb you grind so it’s JUST plain nuts.) and it worked out perfectly! I took several photos I would love to share if you’d like to see my bread 🙂 Thanks again for this incredible recipe! We will definitely be making more!
Against All Grain
That’s great Genea, I am so happy you like the recipe! You are welcome to share your photo on my Facebook page.
Michela
I’d love to try this out, but would it be at all possible to post the recipe in weight/volume measurements? As I’m in the UK, our cup measurements are not aligned and never find the conversion works
ladyermintrude
I have a ‘cook’s measure’ i got in Wilko’s – it has lots of measures around it including American cups. It is brill!
Janice
I have to begin by saying THANK YOU! I typically don’t give reviews on things because I sometimes don’t have enough great things to say about recipes. But, this bread recipe, and as a matter of fact, every recipe of Danielle’s is to die for. They’re all amazing and mind blowing. Im a stay at home mom, army wife who is constantly looking for recipes to cook for my gluten free, paleo with primal blueprint diet influences. I constantly am looking for a sandwhich bread recipe and often times run into a bunch of filler ingredients that aren’t necessary and in the end, i bypass them. This one I had to give a try. I made my cashew butter with 2 tbsp of coconut oil and cashew flour in my ninja blender. I was worried that I wouldnt get the bread to rise and it did. Anywho, Thanks again for the remarkable recipes and for sharing your passion and story with us. May you all continue to live a happy and healthy life. Gotta get back to my kiddo who is demanding more bread 😉 and my husband who just texted me “Holy BLT’s” in our future.
Seagreenaz
My family has benefitted from the recipes in your book and blog immensely. My eight your old daughter bakes your cookies and brings them everywhere. People are amazed that the cookies are gluten free. She recommends your website out to everyone she meets.
We haven’t baked this bread yet. I have SEVEN children and this is just TOO pricey. After reading ALL the comments, I found this to be a common theme. Has anyone substituted coconut butter (coconut manna) ?
Thanks for any suggestions!
Stephanie McKay
Hello!! I am allergic to nuts….but I can have peanuts (although I know this is not Paleo.) What can use instead of cashew butter??
Anthony
Tahini.
This Old Housewife
Sunflower seed butter.
France
yes. I’m sure it would work.
Lori Bedwell
Do you think there is a way to make this in a bread machine?
Against All Grain
I’ve heard that people have had success, but I have not tried it.
Kirstin
Hi! Do you think this bread would work in a bread machine? Thanks!
Against All Grain
I have not tried it, but I have heard that others have had success.
Kat
Can you use regular butter over walnut butter? Or Kerry’s Irish butter over a nut butter? And can coconut flakes grounded to a powder work as coco flour?
Sarah
“Regular” butter and nut butters are completely different things. Nut butters are ground up nuts. Also, you will need to purchase coconut flour, not ground coconut flakes.
Kim W.
Great recipe that not only works, but tastes wonderful. I soaked and dehydrated cashews and made my own butter since I haven’t found a “sprouted” cashew butter at our stores yet. The only thing I did differently was I used organic raw milk instead of almond milk.
It was painful waiting for a peek, and even more painful waiting the hour while it cooled! We’ve all been dying for good bread since we don’t eat modern wheat and shy away from all the gluten-free products on the market. Thank you! I posted pictures of the bread on my blog. 🙂
Krista B
I have an intolerance to vinegar and was wondering if I could use fresh lemon juice instead?
Becky Rider
Any acid will work, because it just needs to react with the baking soda.
Brian
I cannot use almond product due to their high oxalates that contribute to kidney stones. Do you have a recommendation for a replacement. I have been trying to go grain free but everything uses almond flour. Thanks
Against All Grain
My FAQ page offers substitution information for almond flour.
miriam
i made this using what i had on hand: almond butter, baking powder, cow’s milk. my egg whites completely fell because my batter was so thick and lumpy. and i opened the oven before 40 minutes was up so the bread is pretty flat. and despite all this, the bread is delicious. my three year old is asking for fourths, mission accomplished, thank you!
Jessica
Such a great recipe. When I discovered your work I was amazed and thought it was too good to be true. Beautiful images of foods that I thought I would not be able to eat again if I was going to take control of my fitness and heath. When I made this for the first time I left out the flour by mistake but it still came out great and was so good as french toast! When it was cooking and I looked through the oven door I was so thrilled to see it was rising. (It does not take much to excite me!) I have never been a cook before so this is all new to me and I am so happy! This is a great recipe and I can not wait to try the rest. I am making the pizza tonight. Thank you for all you do! I wish you success and happiness.
Bethany
I forgot to add the water pan….anxiously awaiting the results. 30 min and counting. Also, when whipped eggs are added – does it have to be added by hand or is hand mixer ok?
Natasha
OMG! I have never posted or commented on a recipe before but this bread is by far the best bread I’ve ever tasted, and I’ve been through sooooooo many recipes. I can’t wait to try the other recipes and waiting for the book.
Martin
Hi,
Can I store it like normal bread – on room temperature???
Or does it have to be in the fridge?
Thanks
Danielle
You should store it wrapped tightly in the fridge.
Martin
Thank you for the quick reply!
Pam Azzariti
Hi, I made this yesterday followed the recipe to a T except used sunflower seed butter. It was delicious except it turned out GREEN , yes Shamrock green! Have you ever heard this? It had to be the sunflower seed butter since that was the only thing I changed. It looked like I put green food coloring in it but didn’t.
Danielle
Yes, it is a reaction btween the sunbutter and the baking soda. You can read about it here, https://againstallgrain.com/2013/03/15/cinnamon-oatmeal-raisin-cookies-st-patricks-day-style/#comment-1288116420
tina
When sunflower seeds are combined with baking soda it makes a beautiful shamrock green. It is perfectly safe to eat and fun to make for St. Paddies day.
Miriam
Mine did too!!!! Did you use trader joes brand? It was all I had and and can’t send nuts to my sons school. It was bright green ! Crazy. I have used tahini and almond butter both to good effect.
Marci Hahn-Fabris
Use baking powder instead of soda (may need to use a little more, 1.5 tsp maybe) Use twice as much lemon juice as baking powder, and your sunflower seed baked goods will not turn green.
Tina
Can you make it without eggs, with egg substitute or flax seed?
Denise
Which almond milk do you use? The stores carry original, vanilla, unsweetened, etc.
Donna Baker
I used vanilla. Turned out great but not white
Samantha
Is there a replacement for cashew butter that you’d recommend — no nuts for me :/
Tina
Can you use egg substitute or flax seed?
disqus_T0yGrkbxbC
Is it possible to replace the cashew butter with peanut butter? I’m not able to find much in my local area, atm, but I would love to give his bread a whirl! Also hat is your opinion on using cassava and rice flour?
Carrie Choong
Peanuts are not really nuts they are legumes
disqus_T0yGrkbxbC
Yes, peanuts have a major identity crisis..Lol. This is precisely why I am asking, trying to figure out if the nut itself is doing something for the recipe, or if it’s more for the texture/flavor. I am not quite clear on what part the nut butter is playing in the recipe!
Michelle
I think the cashews impart a pretty neutral flavor. Peanut butter will be very peanut-y. 🙂
Gentry Carter
Do adjustments need to be made for altitude? Anyone made this at a mile high?
Michelle
i live in denver. you dont have to worry about any gluten-free baking at elevation. altitude only matters if you have gluten involved 🙂 a pro baker told me this! @gentrycarter:disqus
Cara
Actually, the oven temperature needs to be taken into account with different altitude levels. I’m not sure what the adjustments are but that is one that needs to be made.
Michelle
@cara @gentrycarter:disqus I made this Saturday night and it turned out great! I would say, go for it. I have been baking Paleo/ grain-free for a few months and, although sometimes I have to bake items 10-15% longer, have not had to make significant adjustments for altitude here in Denver or up in the mountains (10K feet).
Linda @ Fit Fed and Happy |
Where can I find apple cider vinegar?
Danielle Klassen
My daughter is allergic to eggs. Do u have a substitute suggestion I can use?
Danielle
You can research different substitute online and do some experimenting. I have heard that some people have have success with a flax egg and applesauce as subs.
Jessica
You can substitute eggs with a chia seed/water mixture. Google Food Renegade’s chia seed egg substitute.
Kristen McDonald
Danielle, thank you SO much for all your efforts! I just made this bread yesterday, and it is the best homemade bread I’ve made so far. It means so much to me that there are people like you out there who are creating wonderfulness for those of us with dietary restrictions. Your lemon bar recipe is also phenomenal by the way. Also, thank you for making this recipe so descriptive, as I was able to pull it off while I’m still learning how to cook!
Nicole
Hi Danielle!
I really want to make this bread! It looks fantastic. My husband has so far in our Paleo eating career detested anything I make with coconut flour. He seems to be fine with almond flour. Will the bread turn out if I switch out the flours?
Thank you,
Nicole
Amy Martin
Just a note at Trader Joes you can get raw almond butter for 6.99 a jar versus cashew butter at 13.00 plus-at least that is what it is here in Arizona-worth a check if you have a Trader Joes. I make my own cashew butter weekly in a ninja-works well but takes a while-really want a Bend Tech blender!
Jen
Fantastic recipe!!! Moist and fluffy. I am shocked that a bread can be made this great without a grain. You are an artist in the culinary world.
Michelle
Your bread looks amazing. I’m so going to give it a try.
Sarah
Looks like only coconut flour for you then. Nothing else is Paleo. 🙁
Michelle
Maybe sunflower seed butter? People are reporting tahini works well on Instagram!
Sandi
You say it is yeast free but it had apple cider vinegar which is a no-no for those with yeast allergies. All vinegars are.part of the yeast family.
Lisa
I used lemon juice instead of the vinegar. My son is allergic to brewery’s yeast. It came out good.
Bonnie
Did you use the same amount lemon to vinegar?
DSimpson
My doctor recommended apple cider vinegar too and my son has to avoid yeast…
RickRReed
I was out of apple cider vinegar, so I just used plain old white vinegar and the bread turned out great.
Danielle
Happy to hear!
Madlyhb
My husband and I have been Paleo for about 6 months and the thing we both miss most is bread. We live near enough to Julian Bakery that they carry the Paleo bread at a local store but it falls apart and my husband things it tastes oniony. I think it is just weird. I have made a lot of muffiny type things using almond meal, and we found Dr. Peggy Malone’s naan recipe but this is first real bready like bread and i am so grateful. This bread is a lot of work, and expensive, my husband suggested i make it a couple of times a week to my amusement. That’s not happening, at least not while i have a full time job. But once a week as a treat, definitely! I ordered your book and lovelovelove it. Thanks.
Laura
Have you tried this is in a bread machine? Would there be any changes to the recipe if I used a bread machine?
lemonpie
I just saw this comment. I don’t know your bread machine, but I’m pretty use it would not work at all. Bread machines are made for yeast doughs – they heat the dough, knead, heat again etc. Not possible with this bread.
maremare312
My bread machine has “quick bread” setting for breads like banana bread, etc. I wonder if that would work?
Deb
I have a bread machine with a gluten free mode and a bake mode; choose your timing. It’s a Breadman Pro. https://www.ebay.com/itm/like/161342275575?lpid=82
ladysaucemonkey
I made this last and it is DELICIOUS!! I don’t think it’s going to last very long. I ran out of Almond milk but used Coconut Dream (rice & coconut milk) instead and I forgot to put the dish of water in the oven. It still tastes amazing. It’s so light in texture. I think i prefer it to normal bread!
It’s so nice to have something with that cakey/bready home baked taste that still fits in all my restrictions.
Thank you so much. I can’t wait to try more of your recipes xx
Olly NZappa
So I’m too lazy to make almond milk, could I sub with grass fed organic milk or coconut milk?
Roadqueen75
I made it with coconut milk, turned out great!
Danielle
You should store it in the fridge, wrapped up tightly.
Santa
Thank you so much for this recipe! This is the first ever paleo-bread that I’ve ever made, and it came out fantastic!
I used homemade cashew butter and it seems that it wasn’t a problem at all.
Danielle Hudson
My family absolutely enjoys this bread recipe and even my bread-eating husband! I have mastered the bread twice now but not the whiteness of it. I even like that you said cut it the other way to make it longer. Thanks so much for sharing yourself with us!
K Foley
I made this today and followed the recipe exactly. It was delicious but was dark brown and did not rise. Any suggestions?
VicksieDo
What is the carb count on this? If it’s reasonable, I’m making it!!
Sarah
I make this bread for my daughter and she absolutely loves it! My niece has a gluten allergy and I’ve thought about trying to alter this recipe for her mom as they are not Paleo, just gluten-free. Her mom has trouble trying to make bread that is affordable. Since my niece is not dairy-free would it turn out the same using regular butter instead of the almond butter, or is there another source I could use since they aren’t Paleo? I’m just trying to give her a really great gluten free bread recipe that isn’t expensive! She currently spends 6.00 on a bread mix and that seems awful.
Mena
How about just skipping bread? You learn to deal with it after a bit. Teach the little girl about health and how her body is different than some people’s. My kids know… they simply can’t have some of the things other people can. Kid’s are fine with boundaries.
Whitney
I just made this and it turned out great, but it wasn’t white. I placed a small dish of water on the bottom rack like the instructions said. Any ideas on what I did wrong? At least it tasted great!!!
Lisa M Hodel-Brewster
Can I make it with soy or rice milk? I can’t use nut products or dairy.
Karen
Can this bread be stored in the freezer? If so, how long can it be stored? Thank you!
Scgoff
Just made this for my husband who is ScD and it is SO delicious!!!!! Thank you – after a few years of awful store-bought grain free breads, I may have made him happier than he’s been in a while; at least when sandwiches are in question. Thank you thank you.
Danielle
I always use full fat coconut milk from a can. I like Natural Value the best as it comes in a BPA free can https://bit.ly/1rXMACJ.
Kellie
I just made this with flax “eggs” and it did not turn out well. It was flat and it tasted almost like a peanut butter cookie due to the mount of cashew butter.
LaVonne Bunt
Made a loaf for the 1st time this morning (before seeing this post). It is fabulous! I had a pan of water beneath the loaf & that worked well. Your hints in this post are very helpful for the next baking session. There will be many more…thanks.
Debbie
Danielle, My family is allergic to eggs (duck & Chicken). Is there any way to add “egg replacer powder in place of egg whites?
lemonpie
Here’s the opinion of a European – aka someone from bread paradise. I tried this bread a couple days ago. Unfortunately, I threw away the last quarter today. First of all, this paleo bread turned out better than another one that I tried a couple months ago. I followed the recipe to a T, but apparently I didn’t mix the dough long enough or some heavier ingredients sunk to the bottom while baking it – the bread turned out a bit marbled. It also fell about after taking it out of the oven. So it didn’t look as pretty as on the pictures, but that was not that big of a problem for me. I toasted the bread and had it with honey and a second slice with just butter, salt and pepper. The bread falls apart very very easily – the gluten aka the glue is just missing. So the texture is okay, but I not very enjoyable. It’s more like a cake, too. My family described it as a cake, not bread. I was expecting that because American ‘breads’ are often more like cakes (best example: Banana BREAD). It didn’t work with savoury toppings at all. I was hoping to finally find a gluten free bread for my beloved avocado toast – but this is definitely not it. So you can make French toast with it, sure, or top with other sweet things – nut butters, jams, honey, all that would work. But a regular sandwich with this? No way.
The taste was okay. It doesn’t taste like it’s ingredients, the apple cider vinegar kind of neutralizes everything. On the one hand that’s good – I was a bit sceptical of the cashew butter – but it doesn’t make the taste very exciting. The bread lives from its toppings.
If I were allergic to gluten and dying for a PBJ sandwich or French toast, I’d probably make this bread again. But I can tolerate gluten in smaller, irregular amounts, so I will stick to the real thing for now. Btw if you are a passionate cook and just mildly to moderately sensitive to gluten, you should try a whole rye sourdough bread. It’s a classic bread in Germany, where I am from. Rye is much easier to digest than wheat, contains less gluten and the sourdough kind of pre-digests the bread. It takes several days to weeks to make, but it’s more than worth it. You can’t find this kind of bread in America unless you live close to Tartine in SF (I’ve lived in the US for a while, I missed nothing more than real bread – not toast!). Sure, that’s not paleo, but hey you only live once!
To sum up, I won’t be making this bread again. If I were really allergic to gluten, it’d be a different, but for now I will stick to the real thing. Also, this bread is very expensive (more than $8.50) – I’m okay with expensive food, but it’s gotta taste accordingly.
Newtopaleo
I have to agree with you, it’s more of a cake than bread. Although we say banana bread, this too is a cake, and we all know it. This is the first gluten-free bread recipe I try and I must say it’s good as toast for breakfast with sweet toppings (I had it with caramel, witch is not paleo at all! ) and probably as french toast too. It’s perfect for my son, who can only tolerate a little gluten. I’m curious to compare with other recipes now.
Caylin
How long is the shelf life with this bread? What is the best way to store it?
Danielle
Caylin, you can store it for up to a week, in the fridge.
Debbie
I don’t have a glass loaf pan, but have the Pampered Chef standard loaf pan. Would that work? Or do you have any recommendations as I would expect the temperature or cooking time might need to be tweaked.
Ronnita
Hi Danielle! i just made your sandwich bread tonight and i really like it. My only complaint it that it didn’t turn out white like it did in the picture. It also isn’t as moist as i was expecting, but I’m not really upset about that because the taste is great. I’m not sure what went wrong with the color because I placed a pan of water on the bottom rack as instructed. I’m thinking that maybe it’s because I didn’t use a glass baking dish. Any advice you would give me would be great and I would really appreciate it. I love your book and have had success with many of your recipes in the past. I made your blueberry preserves to go with the bread tonight as well and it is AMAZING!! One of the things I have really missed since switching to the paleo lifestyle is bread, but because of my autoimmune issues i really must avoid grains. I really want this recipe to work. Please help!
Claudia
is the Honey necessary. I not able to eat, what can I use instead.
Pia
I use Splenda or any other artificial sweetener instead
Lucia
could you also freeze it in?
Katie
Does this have to be refrigerated? I’m traveling with it & it won’t be refrigerated. Thanks!
Anna
I have made this bread twice in the Pampered Chef loaf pan and my recommendation is to cook it for about 30-35 min. instead of what is suggested. When I cooked it the second time, I did 35 min. and it turned out great. 🙂
Esther
THANK YOU DANIELLE!!!! I love this bread, it is without a doubt the best grain-free bread I have ever tried! Just truly have to follow the directions exactly, especially the part about not mixing the wet and dry together until the last possible moment… I could actually see the mixture expanding in the bowl as soon as I stopped mixing before I even added in the egg whites, wow!
Anne Adams
Am I the only one who doesn’t get it? I made this recipe and it was as dense as my pumpkin chocolate chip bread that I make during the holidays only flatter. It was super dense and it’s overly moist. Not something I’d make a sandwich with. It’s also a bit too sweet and looks nothing like the picture – not even close. It’s much darker..like pumpkin or banana bread. Am I missing something here? Cashew butter alone was $12!! This loaf is a bit too much money to make again. However I’m curious about the Apple Cider Vinegar. Could this be the culprit for the poor result? What about using the jar of cashew butter as opposed to raw? Danielle – please help. This recipe is very perplexing.
Fay
I had the exact same result. It’s GOOD bread, but not sandwich bread. Mine did not rise at all (and I didn’t open the oven and preheated correctly), and was the same color on the inside as on the outside–a pumpkin brown. I am going to try it again this morning with a Tablespoon instead of a teaspoon of baking soda, but I would love Danielle’s thoughts as I have been very successful with all of the other recipes I’ve made from Against all Grain. Her recipes are a tiny bright spot in a difficult time for our family.
Jeanne
I made this last night. Quite the process, but would have been worth it if the bread turned out. It looked beautiful when I pulled it out of the even. The toothpick came back clean so that everything was good. Then it started to fall. As I turned it out about 15 minutes later, the inside was raw goo. I ended up flipping it upside down in the pan and putting it back in the oven. Firmed it up, but not great. Quite disappointing considering the cost of the cashews and other ingredients.
Tried a taste this morning. More of a cakey bread (maybe that is because I failed), but can’t see it being used for sandwiches. More of a toast kind of bread.
Slađana Dragičević
i just have to ask… what kind of eggs weigh 9 ounces? the ones i buy are 2.5 ounces and i am really wondering am i crazy or what? i am not from the states, but from europe and maybe that’s the answer, i don’t know. anyway, i used 5 of the eggs i had and the bread turned out ok, but not white. not that i care, though. thank you for this recipe.
Maggiepedia
My eggs only weigh @ 2.2 oz. I think that must be the total weight of all the eggs. (2.2 oz)x(4 eggs)=8.8 oz
Bri
Hai, can you substitute the almond milk with coconut milk?
Danielle
Yes, you substitute 1:1.
April
I can’t wait to make this tomorrow. I went out and bought the Artisana cashew butter today. Wow, it was $15.99!!! It was even more on Amazon. Where do you buy yours and is it any cheaper?? Thanks.
April
I just made this and my 3 year old keeps asking for more. I’m thrilled and it tastes good. Mine did not rise as much as the one in your photo. Also, if you use almond butter for the cost factor instead of cashew, is it more grainy? My almond butter is drfinitely not as smooth as the cashew. Thanks so much for this great recipe.
Krissy Caster
It is grainy 🙂 Just made today with Almond butter in place of Cashew butter. Used Danielle Walker’s recipe (modified)
Robin Huber
This recipe looks great. I have a bag of cashew meal from Trader Joe’s, and I’m wondering if I can use this in place of the cashew butter. Maybe with added water or oil? I believe both cashew butter and meal are 100% cashews, so there should be some way to make the conversion. Anyone have any experience with this?
Tara
AMAZING! So excited to have a wonderful bread recipe that actually feels and tastes like bread. And to have a nut butter and jelly sammie again beats all. Thank you so much for perfecting this 🙂 BTW – I used cashew flour instead of the cashew butter and it turned out fine.
Vicky
Could I substitute the cashew butter with dairy butter or something else, as I am avoiding nuts because of the high phytic acid contents.
ahorn3
You could probably use Agave Nectar instead of the honey.
ahorn3
My bread did not turn out white like in the photos…possibly because I used a mixture of almond butter and sun butter in place of the cashews because I did not have cashews on hand. I did mini loaves and this “bread” came out beautifully. Unlike other comments about falling, mine stayed nice and fluffy. It was a little dry so I think next time I will bake for a little less time when making the mini loaves. The slices went very well with my turkey rounds-like a mini sandwich. The process was quite time consuming and did use allot of dishes-but well worth it Next time I am making several loaves for freezing. This is a wonderful replacement for those of us who love bread and want a bread texture once in a while. I could easily forget about the grain bread with this version. Thank you for posting this Danielle! I am going to keep trying your recipes. I hope they will be delicious as this!
Sue Martin
This bread recipe is DELICIOUS!! I followed your directions exactly (even made my own raw cashew butter with coconut oil in my Ninja) made sure to beat the eggs to a soft peak, and sifted the coconut flour, soda, and salt into the wet mixture. I put a glass pie dish of water on the bottom rack and baked the loaf for 50 minutes. The loaf turned out white, evenly risen, perfect density, and even had the slight crisp outer crust that I love! My first two slices were tasty… toasted with hazelnut butter and raspberry jam on top! Thank you so much for sharing your baking talent! I have MS and need to avoid milk and grains, and with this recipe, I just might be able to do it!! 🙂 I can’t wait to try the rest of your recipes in your book Against All Grain.
Lisa
I tried this recipe today, and the bread turned out amazing! Thank you so much.
Nancy
I absolutely *LOVE* being able to have toast with butter and jam again! AMAZING!! It took me a year to actually make this, but now that I know how easy and straightforward it is, I reckon I’ll be making it more often 🙂
Also, second time I made it, I forgot to put water in the oven beforehand…I realized later and threw in a small dish about 5 minutes in. it’s still baking in the oven now, so we’ll see how it turns out…
Heather
Can grass fed dairy milk and butter be substituted?
Andrea
I have this bread in the oven right now! I made my own almond milk from your cook book. The first time it turned out amazing. But the second time I made it(yesterday), today it was all chunky and smelt rotten. Weird. So I did not have almond milk, so I used coconut milk instead. I hope it turns out!
Larry
is there a way to see the nutritional info for this bread
Deb
You can look up the information for each ingredient.
Cynthia Albert
Cashews are not nuts (lol), they are legumes.
Lori
Not according to Wikipedia A member of the Anacardiaceae family, the cashew is a nut and is botanically related to mangoes, pistachios and poison ivy.
Cynthia Albert
Nope! Cashews, like many of the culinary nuts listed above, are not true nuts in the botanical sense. True nuts develop a hard wall around the seed (e.g. hazelnuts). Cashews instead have a lining around the seed that is filled with a nasty fluid.
Kaylee
I just made this bread for the first time. It was SOOO easy! The prep time was only about 15 minutes and I can definitely see it decreasing each time I make it after today. The loaf itself turned out perfectly also! It rose nicely and tastes delicious!
I made one adjustment: I used raw almond butter instead of the cashew butter, simply because I had all the other ingredients at home and didn’t feel like running to the store to get cashews or cashew butter.
Krissy Caster
OMG! I am so excited. I had my mother be the first to make this. She did a great job. The bread is everything you said it would be. It’s dense and it is moist. We used cashew butter from Amazon. She did not let it sit for an hour. She was too excited and she immediately wrapped it up and came over my house with it. It tastes LIKE bread!! No coconut flavors.. It tastes like normal bread. I love this recipe!!!
Risa
Made this yesterday. Great success! Has anyone tried doubling the recipe and baking two loaves side by side in he oven?
JoAn Nickolette Coker
What is the carb count?
Krissy Caster
Hi there, my mom made Danielle Walker’s bread recipe (modified) using Almond Butter in place of Cashew butter. Here it is! Smell nuttier and looks grainier. I have not tasted it. This is what it looks like. 🙂
Sara C
Thank you for posting this! I was just searching to see if anyone had tried the bread with almond butter and you posted with a picture. Yay!
Did you love the bread?
Krissy Caster
That IS cheaper! I buy mine on Amazon and is at least 2 bucks more!
Pam
I have seen several comments about their bread not rising like the pictures so many have posted. Mine came out darker and not nearly as big. The only thing I did differently was the cashew butter was made with roasted cashews. I can’t imagine that did it but I would love to hear suggestions. Its tastes yummy, just would like a bigger loaf 🙂
Levina
Can peanut butter be substituted for cashew butter
Trisha Samseli
Best bread I have ever had. Amazing, in fact. I made my own cashew butter. First time. I loved it so much that’s all I am going to eat from now on. I wonder why cashews/cashew butter is so expensive?
Annie Gonzales
Oh my goodness this tastes like real bread! It even smelled like bread while I was baking it! I used a 9″ x 5″ glass pan because that’s what I had but I had no problem with it falling flat. It is a little bit crumbly but not bad at all. Thank you so much Danielle!
Denise Lockhart
Hi
I made this today.. did not rise very much but I think that was my fault. Could a little less soda be used as I do not like the taste?
Tricia
I have made this bread many times with minor adjustments here and there (ex. different flours, nut butters, etc) and never had a problem besides eating the whole thing too quickly! Great recipe thank you:)
Pipes Pipers
Would you happen to happen to have the measurements in grams?
Denise Lockhart
just made my second loaf and it is flatter than the first lol
pauline
I have made this bread twice now and it is delicious. After the first couple of slices in both loaves, I encountered a dime sized whole running through the middle of the loaf. I live above 5,000 feet and am wondering if it is altitude. I follow the recipe exactly…except it seems to cook in a little less time. Any ideas for eliminating the hole?
MishMash
I’m new to all this. I made almond milk the other day and although I’d read that you could save the pulp after staining for use as flour, due to lack of knowledge about this all and on that day time, I regret not doing it. Oh well, next time 🙂 My question here is can I substitute the cashew butter with macadamia butter? Ideas thoughts greatly appreciated. Peace and love.
Danielle
Yes, cashew and macadamia butter are great substitutes 1:1, although the color and flavor will change slightly. ~Eileen
Lydia Greenwood
Can i substitute the cashew butter for tahini? would that give it a really wierd taste as its quite a large amount? I can’t stand the taste of tahini by itself.
barbaradrady
Danielle,
I love this bread but have difficulty every time I make it. I’ve followed your directions exactly, tried to beat the eggs to stiff, tried folding in the egg whites starting with 2 tablespoons and beating them in both ways. Each time I bake the bread to the appropriate time, the toothpick comes out clean, I remove it from the oven and 10 minutes or so later, the cake falls in the middle. I have the temperature checked on my oven too. You can see I’m determined to make this. Any suggestions of how to ensure the results you’re getting?
Thank you!
Barbara
hanna1
Hi Danielle,
I made the bread tonight, and while it came out wonderfully (I used almond butter in place of cashew) – It didn’t rise much (came to about 3/4 of the pan size) and definitely is quite dark (though that could be the use of the different butter) – any suggestions how to get this to rise a bit more? Thanks! 🙂
Carly
This is a fantastic bread substitute if you are needing a bread fix on a paleo diet!! To save money I buy the raw cashew meal at Trader Joes (ONLY $5!!! for one pound makes 2 loaves!) and turned it into butter with our juicer. One day I was not in the mood to make the butter and tried substituting the cashew meal in place of the cashew butter. I was so excited when the loaf was still very good and close to the original. The only difference is a slightly more textured loaf with a little less rise. I chose to sacrifice that for the cost difference. Now I make 2 batches every 2 weeks. Thank you Danielle for your wonderful and creative ideas!
Valerie
Hi, Is it freezer friendly ? Thanks 🙂
Pamela Grow
Second time I’ve made this and I stumbled on to a secret. I accidentally pre-heated my oven to 350. It wasn’t until I went to put the bread in that I realized my temp was too high, so I turned it down immediately, popped the loaf in, and checked at 43 mins. Sheer perfection! It browned much nicer than the first time and the taste and texture were both perfect! I’ve been cutting out grains and had a fierce craving — this nipped it in the bud. Thanks for the recipe.
Whitney
Does the cashew butter need to be raw? All I could find at my local supermarket was roasted.
Pia
Mine was roasted too, and turned out perfect. Exactly like the picture and yum
Anna
I made this recipe today for the first time but forgot the almond milk – still tastes great through!!
MillieMeww
I can’t have eggs… Do you think a replacement would work? Egg-replacer, chia egg, flax egg..? I’m desperate for a bread that meets all of my dietary needs and this one is sssooooo close!
Sara C
Use gelatin as a replacement. A quick google search should turn up the ratios.
Staci 'Grainne' Corcoran
wondering about freezing this, if freezing it in a large chunk would work, or you’d want to slice first..?
Jill
Received my Against all Grain cookbook this afternoon….enjoyed this DELICIOUS bread this evening!
Maddy
Hi Danielle,
This is the first paleo bread I made and it turned out to be wonderful. Thanks!
Michelle
I used homemade cashew butter and this was so yummy! I only tried a small end piece with a little honey, but am so looking forward to trying this as a sandwich, with homemade mayo, turkey, lettuce and tomatoes 🙂 🙂
Jane Evans
I LOVE this recipe! I have been gluten free for 4 years and have tried many sandwich bread recipes and have been disappointed each time. I made this bread tonight and have eaten half of the loaf! Can’t wait to try Danielle’s hamburger buns.
Danielle
There is usually a few reasons this happens: the loaf pan that you are using is larger than the one Danielle recommends, or the baking soda is expired (or you used baking powder), or you may have over-mixed the egg whites. ~Eileen
wenrod
Hi Danielle,
My family and I are renting a vacation house for the week and would like to have several loaves of your bread ready to go. Do you recommend freezing this bread and is it possible to bake up to 4 loaves at a time? If not 4 loaves, maybe 2? Thanks for your advice!
Cynthia Dougherty
I just made this today with homemade cashew butter and cashew milk. I have been Paleo for one year now, and I’ve baked many different bread recipes. I have NEVER seen one rise this well, or smell this “bread-like.” I poured the dough into a cupcake pan for dinner rolls. I can’t wait for these to cool. If they taste anything like they smell, I’ll be coming back to this recipe many, MANY times! Thanks!
Kit
Fantastic Paleo bread. Put a bit of honey on the top and “voila” it’s a cake too.. Thanks for sharing…
Cynthia Dougherty
I just made this today with homemade cashew butter and cashew milk. I have been Paleo for one year now, and I’ve baked many different bread recipes. I have NEVER seen one rise this well, or smell this “bread-like.” I poured the dough into a cupcake pan for dinner rolls. I can’t wait for these to cool. If they taste anything like they smell, I’ll be coming back to this recipe many, MANY times! Thanks!
pourquoi45
I am sensitive to coconut flour of all things. What can I substitute? Almond flour? If so, how much?
Thanks!
Jane
Made this for the first time this morning. I was so pleased to finally have a piece of bread under my egg. It was so tasty and satisfying.
Ashley
Any tips on how to wrap the bread for the fridge (and in what?)?
Thank you!
Lindsay Kerstin
My bread turned out great. No hole in the middle. I used the smallest loaf pan I own (yes, unfortunately they vary) I put a 9×13 pan of water directly under rack with the loaf (in fact, the 9×13 was almost touching the next rack up and I did NOT use convection. I mixed the batter and egg white peaks just until incorporated (I kind of finished by hand). ….plus I threw out a prayer as I was hesitant to make this with some of the reviews. 🙂 Mine was roughly 5″ high. ***However, I do have a question. If I 1 1/2 the recipe to get a taller loaf, would this throw everything off? Thanks for all the amazing recipes.. I also made the waffles this morning for the 1st time. I am just amazed that these creations can be made w/o flour or gluten! ~ Lindsay
Michelle
Hello I was wondering if I could make this with sunbutter to make it nut free friendly? My daughter really likes this bread and it’s the only grain free bread I have made that she actually likes to eat. She is starting preschool next week and I want to keep her grain free while she is there. Thank you for your time.
Kathie
HI Danielle, I wonder if you can make this bread with cashew meal rather than cashew butter? It is more convenient (and less expensive) and easier for me to find raw cashew meal (or pieces) rather than raw cashew butter. TIA, love your stuff girl.
Alicia
What size was the smaller pan you used?
SillyMcDrippins
I used a custom size 3.5×7 glass loaf pan. But a similar smaller size
should work too. When I used my silicone loaf pan, my bread came out
dark like wheat bread but tasted good. I tried lowering oven temp by 10
degrees and my bread came out so much lighter. Still tastes same as the
darker bread but the lighter bread seems less dry.
Alicia
I just made this bread for the first time and it’s delicious! I followed the recipe exactly, mixed the eggs separately, and cooked the loaf for about 51 minutes (checked it at 45). It only rose about 2 inches! What is usually the issue when this happens? Do you think I over mixed the eggs? Should the eggs be room temperature? I checked my baking soda and it has not expired yet. Thank you so much for all that you do! Your cookbooks are my new bibles! I can’t wait to use this bread for various meals and perfect the recipe!
Susan Danner
Can u use coconut butter instead of cashew
Shawn the Meatman
Hey Danielle. I made this today for the second time. My first loaf had similar falling issues, and I agree that my pan was too wide. I made a double batch this time and baked in two separate Baker’s Secret no stick loaf pans, i believe 9×5 OUTSIDE TOP DIMENSIONS, 7.5×3.5 inside bottom. The pans each hold a quart of water. They baked up just fine side by side in 45 minutes at 300F. They did fall just a bit, but cooled to a proper loaf shape, and will make great, albeit small, sandwiches.
I will use a leave-in probe thermometer for the next batch to test the 205F theory.
I made my own cashew butter in a Kitchenaid food processor. I hope to upgrade to a “real” blender someday! This is not a fun task. Doing so, though, had brought the cost of this loaf down to about $6 for me.
I am a professional chef and I always weigh my ingredients when trying out new recipes. Here’s the stats for the next person that asks:
(There are 28 grams in an ounce)
About 8.5oz cashew butter
About 8oz egg
14g honey (I like mine on the savory side)
14g vinegar (I round up to a full tablespoon)
2oz almond milk
36g coconut flour
The leavening ingredients I dont weigh, as they are used in such small quantities.
TOTAL BATTER WEIGHT: 21oz
I really, really like this bread. I look forward to experimenting with add-ins. I’m thinking right now about replicating my favorite long lost Rosemary Potato Bread, by folding in some diced baked potato and fresh chopped rosemary.
thebayman
……if I do not like the height….can I double the recipe to get a “higher” bread? would that work?
Ashley
Is there a way to make this bread without eggs and still have it turn out good :/ Just found out yesterday I can’t have eggs.
Kristen R
Hi Danielle, thank you the bread is delicious, I have added some flaxseed meal and chia seeds for the omega 3, just wanted to check can I freeze it? Thank you
Danielle
Hi Kristen, this bread freezes very well. Make sure you freeze it in a completely airtight container, to avoid freezer burn. Danielle suggests slicing it, then placing parchment in between the slices before freezing. This way you can take out just as many slices as you need. ~Eileen
Sharon
Danielle,
I am very excited about finding your cookbooks and looking forward to trying other recipes. I’m not a great cook, but I can follow a recipe.
My bread tastes “spongy”. Did I overmix? It did not fall. Also, is not your nice white. Would Guar Gum keep it from falling and help w/ the rise?
Jules
Danielle,
I have used about four different recipes for paleo bread, this is BY FAR the best!!! The only thing I changed was adding a little bit of chia flour (to help hold things together) and ground flax to give it a grainier look, I also used AMAZING fresh honey from a local farm and I think this helped with the taste and texture. Not only is it the tastiest paleo bread I have had, but it holds well and is nice and moist. I had an egg sandwich for breakfast and a turkey sandwich for lunch (ok, I’m overdoing it-but I have missed bread)
Thanks so much for the recipe, it will be a life saver when I need to make paleo meals for outside the house; I’m getting sick of carrot sticks with almond butter!
Eileen
My bread fell within 10 min even though it looked beautiful coming out of the oven. I baked it for a full 50 minutes, as instructed. What went wrong? My oven temp was exact and I never opened the oven to look on it, also as instructed. Please help! Huge disappointment. Lastly, the inside was clearly raw but the outsides looked right on
Danielle
Although we can’t be certain what went wrong, there could by a few reasons this happens. Perhaps the baking soda you used may have been expired, or you may have over-mixed the egg whites. Oven temperatures also vary, so you may have to make some adjustments such as lower the temperature slightly and increasing the time, to accomodate your oven. ~Eileen
Eileen
I regularly replace my baking soda because Imbake quite often. My only thought is maybe omit the pie pan w/some water on bottom rack as you had recommended. Too much moisture in the oven?
Danielle
The pan with water helps the bread rise, so it is recommended for that reason. ~Eileen
Teresa Malone
Has anyone made this in a bread machine? I have one that has a gluten free setting.
Katherine
Thank you so much, for this bread is amazing. I followed every direction, even bought a glass loaf pan from Target. I did.use almond butter instead of cashew butter. Even my gluten eating husband said it was good. Also, your chicken verde recipe also gets thumbs up! 🙂
Devon
I’ve made this bread over, and over, and over, and over again, but the darn thing won’t rise! I finally found a 8 x 4 loaf pan albeit not glass but tin—finding that size without ordering one an paying shipping + taxes was hard enough. I put the bowl of water in the oven while it’s heating up—how steamy should it be in the oven? I beat my egg whites separately until peaks form. Yet, I always get narrow bread no where in the realm of conventional size. Does anyone have any suggestions? The bread always tastes good—I am openly addicted to it, actually—and I got down the color, but I can’t use it for anything besides something to snack on.
Side note, my last batches consistently were not fully baked through even at 50 minutes in a 300 degree oven. Do you think I should bump the temperature up from anywhere to 310 to 350, or keep it in x more amount of minutes?
Danielle
The glass helps the color more in my opinion, but the size is what really matters. 8×4 should do the trick. You could be overheating the egg whites once they’re in the batter and deflating them. This bread is definitely nowhere near a “conventional” bread in terms of height. The slices you see in the photo at the bottom are the ones that I mention you can slice differently to get a larger slice. If it tastes good, then that’s what matters! If it’s not cooked through at 50 min then your oven may run a little low. Have you ever used an internal temperature gauge? You could try bumping it up to 315 or 325 and seeing if that helps.
Lorelei Diaz Vitulli
I used sunbutter instead (allergies) and my batter is really thick. Should I add another egg yolk ot more milk?
Joe C
This is a fantastic bread! However, be aware that if you’re going low-carb, each slice has about 9 grams of carb. That’s a dangerous level for something that tastes this good! Slather it with butter to reduce the GI or put it under local and key.
Danielle
Hi Sam, the smaller glass pan is recommended for the best results. A larger pan will make a shorter loaf. The glass pan cooks the bread more evenly, which helps in rise, and Danielle feels it helps create a lighter colored bread. Also, make sure you put the pan of water in the oven as well, for the best results. ~Eileen
Jane Guillory Bulliard
can I substitute almond butter for cashew??
Danielle
Yes! It’ll change the color and flavor a little bit but will work.
Shell Ann
I am so excited to bake this bread. It is my project today. Thank you for creating and sharing.
Shell Ann
I made the bread, and it is delicious! The only thing is that it was a little eggy and I could see the egg whites (spots) still in the bread after baking. I am thinking I either whisked the whites too long (I did make big peaks) or I didn’t combine it all enough (for fear of overmixing). What do you think … perhaps a little of both? Do you typically whisk (in mixer) the whites until very stiff? I am definitely making this again! Thank you for sharing! 🙂
aakapell
https://uploads.disquscdn.com/images/760be6935be18642f0cf14dac12d82e40fa3b5b93b4c93d73831e2c8928684d4.jpg
I LOVE this bread recipe and have been making it for over a year now. I experiment at times with changing the nut butters and adding ingredients like raisins and nuts. recently I have been getting this strong GREEN colour which is very disturbing and unappetizing! HELP PLEASE. I eliminated the exta added ingredients (like raisins and pumpkin seeds) and went back to the straight recipe and still happening. I have changed the nut butters around and am still getting it. I need further experimentation to find out the cause, but if anyone has had this happen I would appreciate some help. thanks.
Danielle
It turns green when you use Sunbutter! If you use fresh lemon juice it should counter the green. Otherwise try reducing the baking soda by half.
aakapell
thanks Danielle for your helpful information that sunflower butter was the green culprit. I went back to using almond butter and got my original loaf. Also wanted to say that I don’t particularly enjoy cooking and don’t care for fussing and found that separating the egg whites added to too much work for the loaf so now I just throw everything but the baking soda into my nutribullet, pour into a bowl at end and add the baking soda last and it comes out the same as when I used to separate the egg whites. much faster and easier for me. great recipe. https://uploads.disquscdn.com/images/0a4372bcfa6fe05d31f2467a3f072c4884cd1f4542bac480503a299df0cf9925.jpg
Shelyn Aikens
Hello everyone
Ok, I tried this recipe and was a nervous because so many recipes for paleo/vegan etc seem to almost never come out like the picture or like the one who posted the recipe …. however there is a first for everything and after reading the comments on how this bread falls in shortly after coming out the oven looking perfect … I did everything exactly as explained only (two things: I ran out of cashew butter by half a cup so I ground fresh almond butter to make the full cup of nut butter and I added 1 tsp of baking soda to the dry ingredients ) and waaa laaa
My bread never fell!! So excited oh, also I don’t have a loaf pan so I used an 8×8 glass square pan and i took it out of the oven once 45 min was up and let it cook per directions !!!
Thank u so much I’m sooooo excited
I posted a pic below … once I get a loaf pan this bread will be perfect
Thank u again!!
Shelyn Aikens
https://uploads.disquscdn.com/images/a4211e86d90f35495cbb0770b546a472aba9ff91890d21044cf5a9451103f3cf.jpg
Anne
Mine did come out well, similar to the picture, texture is good, but dang, all I taste is the eggs. Don’t get me wrong, it is good, it’s a little much for me on the flavor but what an accomplishment Danielle Walker created here for those that truly cannot eat grains. I will of course still eat it up, it’s to expensive not too but I made the cashew butter myself and that was a HUGE pain and took nearly and hour just to get to consistency in my Ninja. If I make again I will certainly buy the butter! https://uploads.disquscdn.com/images/d6ae8eae86febe58715390be9a0309450b20ba7a7d48f509d871a58c50270d2b.jpg !!
Martha Ponce-Fair
I need to make this bread without eggs, using egg substitute. Help, all other ingredients ok. When I make the cranberry orange muffins using egg substitute, the muffins are very wet, due to the liquid required to reconstitute the egg substitute powder. Any suggestions?
Danielle
Unfortunately this bread will not work without eggs. What egg sub are you using for the muffins?
Laurie Delgado
https://uploads.disquscdn.com/images/78a94f6f79aebbf226513d0f05f37b9a1c433e622c77967eb02907c34d93ab26.jpg So I made the bread but not sure why my bread looks more on the darker side compared to yours…? It was very delicious though! It’s also very filling and you really don’t need to serve yourself very much.
Eva
Baked it with peanut cream (I know, I know, but that’s what I had at home) and it is simply fabulous! I think I’ll stop looking for bread recipes and just stick to this one. I’ll try with cashew butter too, even though it’s expensive it comes out cheap in the end, considering the loaf keeps perfectly well in the fridge and (frozen in batches of 4 slices) lasted me for 3 weeks.
Danielle
Glad you liked it!
allison
Can anything be used to replace the the eggs? We have an egg allergy in the house..
Danielle
Unfortunately egg replacers will not work for this recipe
Heidi Engelhart
I made the bread and I like it but mine become soggy after a day or two. Any suggestions why?
Chantal Martel
Is the bread supposed to taste nutty?
And how do I avoid that taste?
(I used almond-cashew butter instead of just cashew butter…is that why?)
The Mrs. Simpson Project
Hi there!
My family and I are needing to go grain free for health reasons. Only thing is, I’m allergic to eggs. Which makes baking grain free bread a challenge to get the fluffy bread texture. I get an awesome bread pudding texture instead…
What kind of egg substitute can I use to get a better bread texture? I’ve tried the ener-g egg replacer and flax seed meal so far.
Elsie Rydbom
Can’t wait to try this. Have been looking for a good bread recipe
Andi
Wanted to make this for my daughter. Recently found she’s allergic to milk products, eggs, gluten and bananas. Any way I can make this with flax eggs?
Danielle
Hi! I don’t recommend subbing more than 2 eggs per recipe as it might / can affect the final outcome. Let us know if you tried it completely egg-free and how it turned out! Another reader will find it helpful if they happen to have the same question you do.
Liesl Maheux
Hi Daniel thank you so much for all your hard work at making all these recipes.
I don’t have an diagnosis but anytime I eat anything with wheat or gluten and dairy I am in terrible pain.
I have been doing paleo for two years but Christmas I thought that maybe I could just let myself go and eat whatever. I went back to strictly paleo three days ago had years smoothie this morning and making your bread as we speak.
Thank you very much, I have all your cookbooks and I am just finishing reading your book food saved you.
Hugs and kisses from Ottawa Ontario Canada 🇨🇦
Alex
That was delicious! I used hulled tahini instead of cashew butter since cashews are high in FODMAP. I also didn’t put any honey, since honey shouldn’t be heated or cooked with. I love the result! It’s like a savoury cake rather than bread, and so delicious. I had it topped with olive oil and dried herbs as well as butter and honey
Danielle
Thank you so much for sharing your modifications! It’ll be so helpful to any other reader who might have to make similar changes.
Caryn Weber
I tried making this today and it looked beautiful coming out of the oven. However, as it cooled, the center sank all the way down to the bottom. Help! Any idea what happened and how to prevent it from happening again? Thank you!
Danielle
Hi! Unfortunately, without being in the kitchen with you, it’ll be hard to determine what went awry. I hope you give it another try! Happy cooking!
Jenna
Hey Danielle, do you think I could sub peanut better for the cashew butter?
Danielle
Hi! I don’t tolerate legumes so I haven’t used peanuts in my recipes. Let us know how it turns out if you attempt to make this with the modification!